After importing synchronized transcripts into your case, Sanction provides a way to easily navigate and manage transcript tasks.
You can easily navigate between the following panes:
| • | Transcript synchronization |

|
When you move from one tab to another, the last clip you worked on is selected. If no work has been done in the pane, nothing is selected. All tasks are kept separate from another.
|
You can work with synchronized transcripts in the following ways to enrich presentations:
| • | Add and clear timestamps as well as jump to specific locations in the media file in the transcript. |
| • | Add information about editing clip properties as well as transcript properties. |
| • | Create media clips with synchronized text playback. |
| • | Add media clips taken from synchronized transcripts to playlists and presentations. |
| • | Hide or show the synchronized text in presentations. If you choose to show synchronized text, you can specify its position on screen, font characteristics, the number of lines to display, and highlighting options. You can also modify the timing, name, and other properties of the clips you create from transcripts. |
Sanction provides a built-in tool to search for clips, manage playback speed, and to manage timestamps.
You can search, filter and navigate existing clips to find specific clip information.
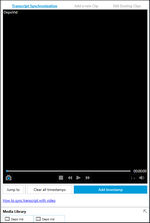
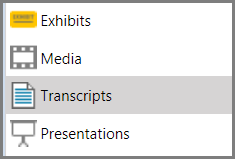
| 1. | On the HOME tab, click the Transcripts navigation bar. |
| 2. | On the Transcript Synchronization tab, enter a term in the clip list search box. |

| 3. | Click the magnifying glass in the search box. |
A list of result(s) of your search term is displayed.
You can sort and navigate the clips by doing the following:
| • | Filter by clip description |
| • | Navigate to the next hit by using the mouse or the up and down arrows |
|
Playback speed can be managed from all three tabs when working with synchronized transcripts by clicking the  button. button.
The following playback speed options are available:
|
You can adjust timestamps in synchronized transcripts to prepare for video presentation.
Timestamps can be removed and added. You can also jump to a specific line in the transcript.
To remove timestamps
| 1. | Click the Clear all timestamps button. |
| 2. | When the warning message appears to remove the timestamps, click OK. |
The timestamps are removed from the transcript.
|
Once the timestamps have been removed, the clip(s) will need to be synchronized to the text once the timestamps have been reapplied.
|
|
To add a timestamp/sync transcript with video
| 1. | Select the location in the text transcript to begin timestamping. |
| 2. | Set the video to the same location. |
| 3. | Click the Add timestamp button. |
You can also press the spacebar.
| 5. | Click the Add timestamp button when the first word of each new line is spoken. |
You can also press the spacebar to add the timestamp.
|
To jump to a specific location in your media file
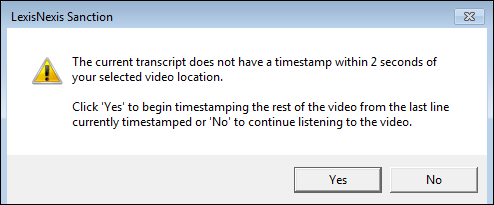
You can quickly jump to a specific location in your transcript that has timestamps applied.
|
The transcript has to be partially or fully timestamped to use the “Jump to” feature.
|
| 1. | On the Transcript Synchronization pane, click the Jump to button. |
The text associated with the timestamp is highlighted.
| 2. | If there is no timestamp associated, you can begin timestamping the remainder of the video. Do one of the following: |
| • | Click Yes to begin timestamping from the last location |
| • | Click No to continue viewing the video at the last selected location |

|
|
|
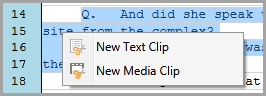
You can create individual clips in your synchronized transcript. This allows you to set the start and end times for a clip(s).
It is also possible to create multiple clips at a time by importing a clip list file. For more information on creating and importing clip list files, see: Clip Lists for Synchronized Transcripts.
| 1. | On the HOME tab, click the Transcripts navigation bar. |
| 2. | Select the synchronized transcript that you want to create a clip from. |
The media player and clip creator open next to the transcript.
| 3. | Specify the start and stop times of the clip from the Add a New Clip tab by using one of the following methods: |
|
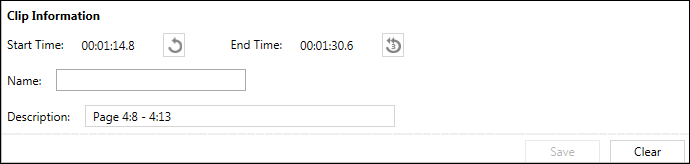
As you create a new clip or edit an existing clip, you can precisely adjust the start or end of the clip.
The method of accomplishing this is to begin playing the clip at a position slightly ahead of the desired start time or end time. Then, as playback proceeds, you click the left right or mouse buttons at the exact position where you want the clip to start or end.
| 1. | Click  to start playing the clip again from the start. to start playing the clip again from the start. |
| 2. | Click the  to start playing the clip 3 seconds before the end of the clip. to start playing the clip 3 seconds before the end of the clip. |
| 3. | Depending on whether you want to change the start or the end time, perform the following mouse operations on the start time field or the end time field: |

| • | Click the left mouse button on the field to move the time back 1 second, or press Shift+click to move the time back 1/10th of a second. |
| • | Click the right mouse button on the field to advance the time 1 second, or press Shift+right click to advance the start time 1/10th of a second. |
| • | Note that these actions cause playback to immediately resume. |
| 4. | Click OK to save changes or Click Cancel if you do not want to save the changes. |

|
You can view the instructions on how to edit a clip within application by clicking the link beside Clip Information.
|
|
| 1. | On the HOME tab, click the Transcripts navigation bar. |
| 2. | Select the transcript that has the clip you want to add to a presentation or playlist. |
| 3. | In the clip list, select the clips you want to add to a presentation or playlist. |
| 4. | Select from one of the following options: |
|
| 1. | On the HOME tab, click the Transcripts navigation bar. |
| 2. | Select the transcript that has the clip you want to preview. |
| 3. | In the clip list, do one of the following: |
| • | Select the clip you want preview and then click the play button on the media player. |
The clip video plays in the media viewer.
|
| 1. | On the HOME tab, click the Transcripts navigation bar. |
| 2. | Select the synchronized transcript that has the clip you want to rename or edit. |
| 3. | In the clip list, follow steps of the changes you want to make: |
|
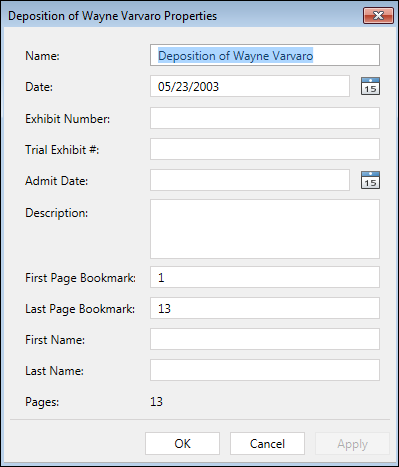
You can edit the first and last pages (bookmark), as well as rename and edit additional properties of a synchronized transcript.

| 1. | On the HOME tab, click the Transcripts navigation bar. |
| 2. | Select the synchronized transcript that you want to rename or edit. |
| 3. | Follow the steps of the changes you want to make: |
|
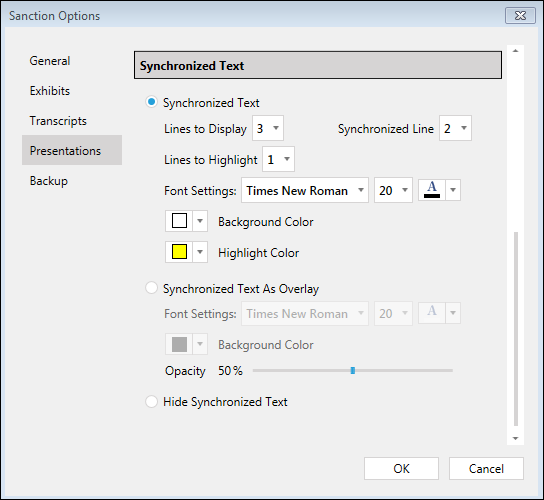
| 1. | Open the Sanction Options dialog box using either of the following methods: |
| 2. | Click Presentations, and then scroll down to the Synchronized Text section of the dialog box. |
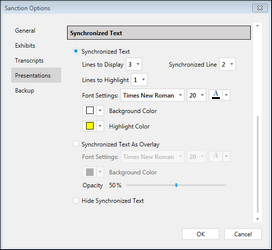
| 3. | Configure options as needed. These are described as follows: |
|