Customize the Quick Access Toolbar

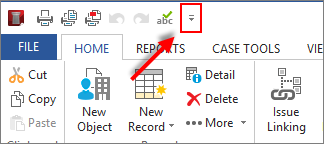
By default the Quick Access Toolbar is located in the upper left corner of CaseMap and provides these commands:

Quick Print
Print Preview
Print to PDF
Undo and Redo
Spell Check

However, you  can customize the placement of the toolbar as well as the selection of commands it displays.

You can also choose which commands to show on each ribbon, and if needed, reset the ribbon to the system default.


hmtoggle_plus1To show or hide commands
1.On the Quick Access toolbar, click the More Buttons icon in the upper left corner.
morebuttons_zoom60
2.To show a button, select its check box. To hide a button, clear its check box.

Menu items with a check mark display on the toolbar.

The toolbar display is updated.


hmtoggle_plus1To reset all toolbar customizations
1.On the Quick Access toolbar, click the More Buttons icon in the upper left corner.
morebuttons_zoom60
2.Click Customize the Quick Access Toolbar.
 
The customization dialog box opens.
3.Click Reset, and then click Reset all customizations.


related_topics_buttonRelated Topics


Need additional help? Email the CaseMap Support team at: casemap.support@lexisnexis.com, or contact a support representative at 800.543.6862 (Option 2, then Option 4). The CaseMap Support team is available between the hours of 9:00 a.m. to 7:00 p.m. Eastern Time, Monday - Friday.

Copyright © 2019 RELX, Inc. All rights reserved.