You can send emails from Microsoft® Outlook (2007 and later) to your CaseMap case.

During the import process, emails are saved as .msg files to a folder you select. CaseMap provides a default list of fields mapped between Outlook and CaseMap spreadsheets. You can edit the default field mappings as needed. See To map email fields. Once you map the fields, CaseMap will remember your settings for the next time you or another case user sends emails to the case.
You can also preview the email before importing to review field data contents, including an attachment count and the name of attachments.
Once emails are imported into CaseMap, you can begin searching the new data as soon as the indexing process completes. When you click the paperclip icon for the new record, the email displays in CaseMap's DocManager.

|
You can only send emails to CaseMap v10+ cases. If you have a CaseMap v9.0 (or earlier) case open, CaseMap will send a message stating that the previous version case is not supported.
|
|
The Send Emails to CaseMap tool is part of the DocManager add-in program. If you have not purchased DocManager, you cannot use this feature. Contact your CaseMap Sales Representative to learn more information about this product.
|
| 1. | Open the CaseMap case that you want to import data into from Outlook. |

|
You must have the CaseMap case open in order to send an email to it.
|
| 2. | In Outlook, locate the email to be sent to the case and click the 'Send Email to CaseMap' button on the toolbar. |
|
You can also right-click on the emails and then click 'Send Email to CaseMap'.
|
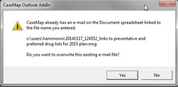
In the Send Email to CaseMap Duplicate Records dialog box, perform one of the following:
| • | Click Yes to overwrite the record. |
| 1. | In the Change file name dialog box, click OK. |
The Send E-mail to CaseMap dialog box opens.
| 2. | In the File Name box, change the file name and other pertinent information, and click OK to continue. |
|
|
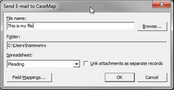
| • | In the file name box, confirm the file name. |
| • | Click the Browse button, and in the 'Save Email as' dialog box, locate the folder to save the email, and then click Save. |
| • | In the Folder box, confirm the folder location. |
Emails are saved as .msg files, using the email subject as the file name.
|
All attachments will be stored in the Documents spreadsheet in CaseMap by default.
|
If you remove the check mark in the Link attachments as separate records check box the Spreadsheet box is enabled.
| 1) | Use the drop-down to select a spreadsheet from the list. |
|
| c. | Optional: Click the Field Mappings button to create/adjust field mappings. |
See To map email fields for more information.
|
| 3. | Click OK to initiate the import process. |
The email now displays in the Document spreadsheet with a link to the email in Outlook.
| 4. | In CaseMap, go to the top of the Documents spreadsheet to see the new record created for the email. |
|
The storage location (Documents spreadsheet) in CaseMap will be different if you chose a different spreadsheet above.
|
| 5. | Click the paperclip icon for the record to display the linked file(s) information. |

Optional: Double-click on the paperclip to display the linked file in DocManager.
For more information, see About DocManager.
| 6. | Optional: In Outlook, continue sending emails to CaseMap. |
| 7. | When you are finished, click the Cancel button in the Send Email to CaseMap dialog box. |
|
| 1. | Open the CaseMap case that you want to import data into from Outlook. |
|
You must have the CaseMap case open in order to send an email to it.
|
| 2. | In Outlook, locate the emails to be sent to the case and click the 'Send Email to CaseMap' button on the toolbar. |
|
You can also right-click on the emails and then click 'Send Email to CaseMap'.
|
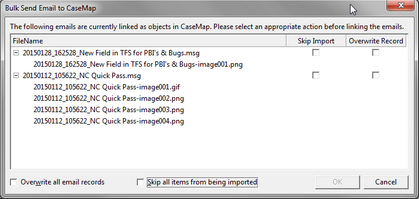
| a. | In the Bulk Send Email to CaseMap Duplicate Records dialog box, place a check mark beside the action (Skip Import or Overwrite Record) for each record listed. |
| b. | Optional: Select the Overwrite all email records or the Skip all items from being imported check box to perform that action for all listed items. |
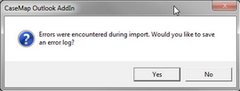
| 1. | Click Yes to save to error log. |
| 2. | In the Save As dialog box, choose a file storage location and click Save. |
|
The Import Confirmation screen displays summarizing the number of records imported and/or skipped.
|
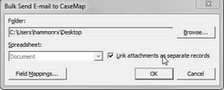
| • | In the Folder field, confirm the folder location. |
| • | Click the Browse button, and in the Save Email as dialog box, locate the folder to save the email, and then click Save. |
Emails are saved as .msg files, using the email subject as the filename.
|
All attachments will be stored in the Documents spreadsheet in CaseMap by default.
|
If you remove the check mark in the Link attachments as separate records check box the Spreadsheet box is enabled.
| 1) | Use the drop-down to select a spreadsheet from the list. |
|
| c. | Optional: Click the Field Mappings button to create/adjust field mappings. |
See To map email fields for more information.
| d. | Click OK to initiate the process. |
The Import Confirmation box displays displays.
|
| 4. | In CaseMap, go to the top of the Documents spreadsheet to see the new record created for the email. |
|
The storage location (Documents spreadsheet) in CaseMap will be different if you chose a different spreadsheet above.
|
| 5. | Click the paperclip icon for this record to view the path and file attachments. |
|
Double-click the paperclip to open the file in CaseMap DocManager.
|
| 6. | Optional: In Outlook, continue sending emails to CaseMap. |
| 7. | When you are finished, click the Cancel button in the Send Email to CaseMap dialog box. |
|
| 1. | In Outlook , click the Send Email to CaseMap button to open the Send Email to CaseMap dialog box. |
| 2. | Click the Field Mappings button to display the Field Mappings dialog box. |
CaseMap provides a list of existing fields that are already mapped for you in the Existing field mappings box. You can modify the default list by clicking on the Remove button and re-mapping fields.

| 3. | In the Unmapped Source fields box, select the Outlook email field that needs to be mapped to a CaseMap field. |
| 4. | In the Unmapped CaseMap fields box, select the field you want to map to unmapped field. |
The mapped fields now display in the Existing field mappings box.
| 6. | Click the Remove button to undo any existing field mappings. |
The fields will display in their respective boxes and will remain unmapped until you map them again.
Advanced field mapping settings allow you to add a source data field to field mappings list, and apply formatting to mapped fields (static text and hard returns). Once you send an email to CaseMap, the field mappings are share with other case users.
| 1. | Click the Advanced button and then click Advanced Mappings. |
| 2. | In the Document Spreadsheet fields area, click your field mapping preference: All fields, Mapped fields, or Unmapped fields. |
This area defaults to displaying all mapped fields.
| 3. | Select the field mapping structure you want to modify. |
| 4. | In the Selected CaseMap Field area, click the Add, Modify, or Remove buttons to review source field mapping types, apply formatting to fields, and to add/modify/delete a source data field. |
| 5. | In the Display Options area, select check boxes to omit prior or next fields if the field value is blank. |
| 6. | Select the Link Object short names check box to automatically link short names for the selected field. |
This option only works in Description fields.
| 7. | Select the Always update field to enable this option for the selected field. |
| 8. | Click OK to save your changes. |
| 9. | In the Field Mappings dialog box, click OK when you are finished. |
| 10. | In the Send Email to CaseMap dialog box, click Cancel to exit the tool. |
|
|
To reset field mappings to the default structure, click the Advanced button and click Reset to Default Mappings.
|
|
| 1. | In Outlook, click the Send Email to CaseMap button. |
| 2. | In the Send Email to CaseMap dialog box, click the Field Mappings button. |
| 3. | In the Field Mappings dialog box, click the Preview button. |
| 4. | In the Bulk Send to CaseMap Data Preview dialog box, review a list of selected emails you are including in the import and review the number of email attachments. |

| 5. | Click Close when you are finished. |
|
| 1. | In Outlook, click the Send Email to CaseMap button. |
| 2. | In the Send Email to CaseMap dialog box, click the Field Mappings button. |
| 3. | In the Field Mappings dialog box, click the Advanced button and then click Load Mappings from File. |
| 4. | In the Open dialog box, navigate to the folder and select the field mapping file you want to load into the case. |
Field mapping files have a .cmbulkmap extension.
The field mapping structure now displays in the Field Mappings dialog box for you to use or modify as needed.
|
| 1. | In Outlook, click the Send Email to CaseMap button. |
| 1. | In the Send Email to CaseMap dialog box, click the Field Mappings button. |
| 2. | In the Field Mappings dialog box, click the Advanced button and then click Save Mappings to File. |
| 3. | In the Save As dialog box, navigate to the folder where you want to save the field mapping file. |
Field mappings are saved as a .cmbulkmap file.
| 4. | In the File name field, type a name for the field mappings. |
| 6. | In the Field Mappings dialog box, click Close. |
| 7. | In the Send Email to CaseMap dialog box, click OK to exit the utility. |
|


