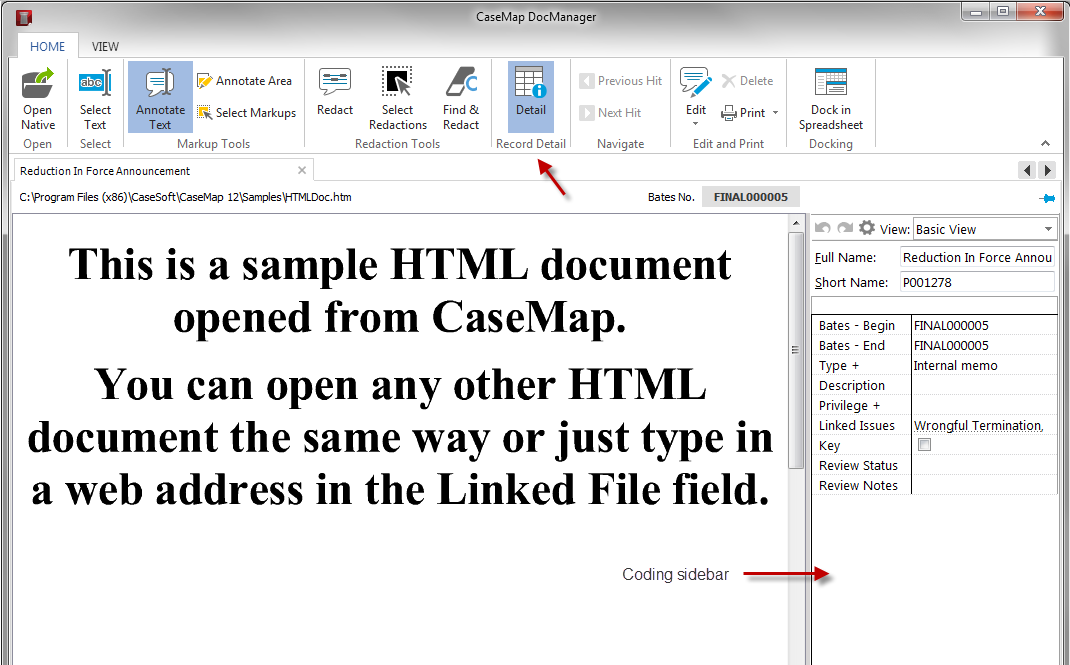
The CaseMap DocManager provides users with the ability to view linked files, documents, and images without having to open the source file in its native application. The DocManager also allows you to view document details and coding data (metadata) simultaneously while in the viewer. When you click the Detail button on the Home ribbon of the DocManager, the Document Coding Sidebar displays, allowing you to easily see the document and provides you with the ability to change coding parameters for documents.

|
Multiple clicks of the  button allows you to toggle between the display/non-display of the Document Coding Sidebar. button allows you to toggle between the display/non-display of the Document Coding Sidebar.
|
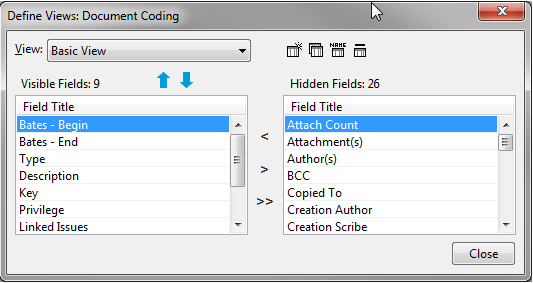
When you click the cogwheel icon  in the View area of the Document Coding Sidebar, the Define Views dialog box displays which provides you with the ability to modify existing coding views, edit document metadata and the ability to add/remove fields to and from the list.
| 1. | In the Documents spreadsheet, click on the paperclip icon for the linked file you want to view. |
| 2. | Click on the linked file to open it. |

The document or file now displays in the DocManager window.

|
If CaseMap DocManager is not activated, you will be prompted activate it at the time you're attempting to view a document, or to obtain a trial copy. If you do not have a license, contact Support ((800) 543-6862).
|
| 3. | On the Home ribbon of the DocManager, click the button. |
The Document Coding Sidebar displays on the right side of the review screen, and the Detail button is highlighted.

|
Clicking the button allows you to toggle between the display/non-display of the Document Coding Sidebar.
|
| 4. | Click the  in the upper right corner to close the window. in the upper right corner to close the window. |
|
During a document review, the metadata for any object can be edited and/or changed.
| 1. | In the Documents spreadsheet, click on the paperclip icon for the linked file you want to view. |
| 2. | Click on the linked file to open it. |
The document or file now displays in the DocManager window.
|
If CaseMap DocManager is not activated, you will be prompted activate it at the time you're attempting to view a document, or to obtain a trial copy. If you do not have a license, contact Support ((800) 543-6862).
|
| 3. | On the Home ribbon of the DocManager, click the button. |
The Document Coding Sidebar displays on the right side of the review screen, and the Detail button is highlighted.
|
Clicking the button allows you to toggle between the display/non-display of the Document Coding Sidebar.
|
| 4. | In the Document Coding Sidebar, click in the field(s) to be edited/changed and make updates as needed. |
| 5. | Navigate to the previous/next document to save the changes/updates. |
|
When you click the cogwheel icon in the View area of the Document Coding Sidebar, the Define Views dialog box opens, displaying one of two standard/default views (All Fields or the Default View).
| 1. | In the Documents spreadsheet, click on the paperclip icon for the linked file you want to view. |
| 2. | Click on the linked file to open it. |
The document or file now displays in the DocManager window.
|
If CaseMap DocManager is not activated, you will be prompted activate it at the time you're attempting to view a document, or to obtain a trial copy. If you do not have a license, contact Support ((800) 543-6862).
|
| 3. | On the Home ribbon of the DocManager, click the button. |
The Document Coding Sidebar displays on the right side of the review screen, and the Detail button is highlighted.
|
Multiple clicks of the button allows you to toggle between the display/non-display of the Document Coding Sidebar.
|
| 4. | In the Document Coding Sidebar, click the cogwheel icon to display the Define Views dialog box. |
| 5. | Optional: In the View area, select one of the following: |
Extended View, where all applicable fields are listed
Basic View, where only selected fields are listed
A Customized View
|
You can customize and adjust the coding fields displayed in the Document Coding Sidebar.
| 1. | In the Documents spreadsheet, click on the paperclip icon for the linked file you want to view. |
| 2. | Click on the linked file to open it. |
The document or file now displays in the DocManager window.
|
If CaseMap DocManager is not activated, you will be prompted activate it at the time you're attempting to view a document, or to obtain a trial copy. See If you do not have a license, contact Support ((800) 543-6862).
|
| 3. | On the Home ribbon of the DocManager, click the button. |
The Document Coding Sidebar displays on the right side of the review screen, and the Detail button is highlighted.
|
Multiple clicks of the button allows you to toggle between the display/non-display of the Document Coding Sidebar.
|
| 4. | In the Document Coding Sidebar, click the cogwheel icon to display the Define Views dialog box. |
| 5. | Optional: Above the Hidden Fields area of the Define Views dialog box, click one of the following icons: |
| a. | Click the New View icon  . . |
| b. | In the Name field of the New View dialog box, enter the name of the view and click OK. |
The Define View dialog box refreshes and displays the new view.
|
All Fields are hidden.
|
| c. | In the Hidden Fields area of the Define Views dialog box, select/double-click on a field to move it to the Visible Fields portion of the dialog box. |
| d. | Optional: In the Visible Fields column, click on the last field moved, and then click the applicable Up or Down arrow to place the field in a desired location/order |
| e. | Optional: In the Visible Fields area of the Define Views dialog box, select/double-click on a field to move it to the Hidden Fields portion of the dialog box. |
| f. | Repeat Step c and Step d until all applicable fields have been selected and are now in the desired column(s) of the dialog box. |
|
| a. | Click the Copy View icon  . . |
| b. | In the Name field of the Copy View dialog box, enter the name of the view, or accept the name as indicated 'Copy of...' and click OK. |
The Define View dialog box refreshes and displays the new view.
| c. | Optional: In the Hidden Fields area of the Define Views dialog box, select/double-click on a field to move it to the Visible Fields portion of the dialog box, if applicable. |
| d. | Optional: In the Visible Fields area of the Define Views dialog box, select/double-click on a field to move it to the Hidden Fields portion of the dialog box, if applicable. |
| e. | Repeat Step c and Step d until all applicable fields have been selected and are now in the desired column(s) of the dialog box. |
|
| a. | Click the Rename View icon  . . |
| b. | In the Name field of the Rename View dialog box, enter the new name of the view, and click OK. |
The Define View dialog box refreshes and displays the updated view.
| c. | Optional: In the Hidden Fields area of the Define Views dialog box, select/double-click on a field to move it to the Visible Fields portion of the dialog box, if applicable. |
| d. | Optional: In the Visible Fields area of the Define Views dialog box, select/double-click on a field to move it to the Hidden Fields portion of the dialog box, if applicable. |
| e. | Repeat Step c and Step d until all applicable fields have been selected and are now in the desired column(s) of the dialog box. |
|
| a. | Click the Delete View icon  . . |
| b. | In the confirmation dialog box, click Yes to confirm that you want to delete the view. |
The view has been deleted and a new Define View dialog box displays.
|
|
You can also modify a selected view by hiding, displaying, and/or moving fields up or down within the Document Coding Sidebar to change the display order.
| 1. | In the Documents spreadsheet, click on the paperclip icon for the linked file you want to view. |
| 2. | Click on the linked file to open it. |
The document or file now displays in the DocManager window.
|
If CaseMap DocManager is not activated, you will be prompted activate it at the time you're attempting to view a document, or to obtain a trial copy. If you do not have a license, contact Support ((800) 543-6862).
|
| 3. | On the Home ribbon of the DocManager, click the button. |
The Document Coding Sidebar displays on the right side of the review screen, and the Detail button is highlighted.
|
Clicking the button allows you to toggle between the display/non-display of the Document Coding Sidebar.
|
| 4. | In the Document Coding Sidebar, click the cogwheel icon to display the Define Views dialog box. |
| 5. | In the View area of the Define Views dialog box, select a view from the menu list. |
| 6. | To modify a selected view, perform one of the following: |
Hiding fields
| a. | In the Visible Fields column of the Define Views dialog box, select/double-click on a selected field to move it to the Hidden Fields column. |
| b. | Repeat Step a as desired. |
| c. | Optional: In the Visible Fields column, select a field and then click the Up  or the Down or the Down  arrow to locate the remaining fields as desired. arrow to locate the remaining fields as desired. |
|
Making fields visible
| a. | In the Hidden Fields column of the Define Views dialog box, select/double-click on a selected field to move it to the Visible Fields column. |
| b. | Repeat Step a as desired. |
| c. | Optional: In the Visible Fields column, select a field and then click the Up or the Down arrow to place it in a desired location. |
| d. | Repeat Step c as needed. |
|
|
You can adjust the height of description fields displayed in the Document Coding Sidebar.
| 1. | In the Documents spreadsheet, click on the paperclip icon for the linked file you want to view. |
| 2. | Click on the linked file to open it. |
The document or file now displays in the DocManager window.
|
If CaseMap DocManager is not activated, you will be prompted activate it at the time you're attempting to view a document, or to obtain a trial copy. If you do not have a license, contact Support ((800) 543-6862).
|
| 3. | On the Home ribbon of the DocManager, click the button. |
The Document Coding Sidebar displays on the right side of the review screen, and the Detail button is highlighted.
|
Multiple clicks of the button allows you to toggle between the display/non-display of the Document Coding Sidebar.
|
| 4. | In the Document Coding Sidebar, place (hover) the mouse over/between a description fields until the pointer changes to a  . . |
| 5. | When the pointer changes to a , click on drag the pointer to a desired location to increase/decrease the size of the field. |
|
Fields can not be less than one line in height, and therefore, adjustments smaller than a line are not allowed.
|
| 6. | Repeat these steps as necessary. |
|
You can drag and drop the field sort order as they are displayed in the Document Coding Sidebar.
| 1. | In the Documents spreadsheet, click on the paperclip icon for the linked file you want to view. |
| 2. | Click on the linked file to open it. |
The document or file now displays in the DocManager window.
|
If CaseMap DocManager is not activated, you will be prompted activate it at the time you're attempting to view a document, or to obtain a trial copy. If you do not have a license, contact Support ((800) 543-6862).
|
| 3. | On the Home ribbon of the DocManager, click the button. |
The Document Coding Sidebar displays on the right side of the review screen, and the Detail button is highlighted.
|
Multiple clicks of the button allows you to toggle between the display/non-display of the Document Coding Sidebar.
|
| 4. | In the Document Coding Sidebar, click in a field to capture the data. |
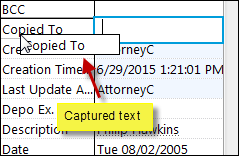
| 5. | When the content of the field has been captured, drag and drop the field to a new location within the sidebar. |
The field and its association data/field is moved in conjunction.
| 6. | Repeat Step 4 and Step 5 as necessary. |
| 7. | In the Document Coding Sidebar, click the cogwheel icon to display the Define Views dialog box. |
| 8. | Above the Hidden Fields area of the Define Views dialog box, define a view based on the new field sort order using one of the Define Views icons. See Customizing View Options for more information. |
|