| 1. | On the Tools menu, click Linked Files and then click Batch Processing. |
You can also open the CaseMap Bates Stamp utility in Adobe Acrobat by clicking on the CaseMap DocPreviewer button and then clicking Bates Stamping. On the submenu, click Bates Stamp PDFs and then click OK in the message box. If doing so, you can now skip to Step 8.
| 2. | On the submenu, click Bates Stamp Linked Files. |
| 3. | In the message box, click OK to send all linked PDFs in the current spreadsheet to the CaseMap Bates Stamp utility. |
| 4. | In the Batch Processing - Review Linked Files dialog box, review linked files and remove any you do not want to Bates stamp. |

The CaseMap Bates Stamp Utility now launches.
| 6. | On the submenu, click Bates Stamp PDFs. |
| 7. | In the message box, click OK. |
Notice that Acrobat automatically launches behind the CaseMap Bates Stamp Utility.
| 8. | In the CaseMap Bates Stamp Utility, click Next. |
| 9. | In the Select the PDF files you want to Bates Stamp dialog box, click the Add Folder button to navigate to the folder where the PDF files are stored. |
| a. | In the Select the PDF files you want to Bates Stamp dialog box, click the Add Files button to navigate to the folder/where the PDF file is stored. |
| b. | Select and click on the PDF you want to send to CaseMap. |
The PDF is displayed in the CaseMap Bates Stamp Utility box.
| c. | Click Next to continue. |
|
| 10. | Verify that the Ignore PDFs that are already Bates Stamped check box is selected. |
| 11. | In the Browse for Folder dialog box, select the folder where the PDF files are stored, then click OK. |

If you need to delete a file from the list, select it and click the Remove File or Remove All button.
| 12. | Click Next to continue. |
| 13. | In the Select the case Bates Numbering format dialog box, select the Create a new case Bates Numbering option, then click Next. |

If you select the Use an existing case Bates Numbering format option, CaseMap will continue using the format you have already been using.
| 14. | In the New Case Bates Format box, select the page number option that is applicable to the document collection you are processing, then click Next. |

| 15. | In the Start numbering at field, type the number you want to use for this set of documents, then click Next.. |
| 16. | In the Prefix field, select Yes and type the prefix you want to use for the Bates stamp, then click Next. |

| 17. | In the Case Name field, type in the name for the Bates numbering format, then click Finish. |
| 18. | In the Review case Bates Numbering format box, verify the Bates numbering range and prefix, as well as format settings. |
| 19. | Optional: Click the Edit button to modify these settings, then click OK. |

| 20. | Click Next to continue. |
| 21. | In the Choose the order the PDFs will be stamped dialog box, select a PDF file and click the Move Up or Move Down button to modify the stamp order. |
Click the Remove File button to delete a PDF file from the listing.
Click the View PDF to review the PDF file before applying a Bates stamp to it.
| 22. | Click Next to continue. |
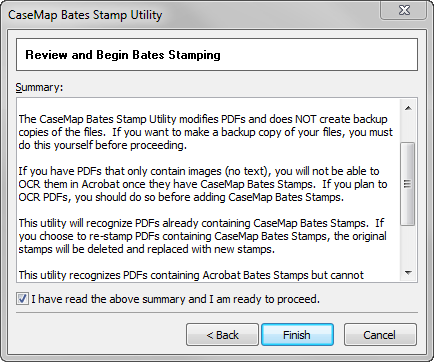
| 23. | In the Review and Begin Bates Stamping dialog box, verify the summary and then select the I have read the above summary and I am ready to proceed check box. |
 Review Review
| 24. | Click Finish to initiate the process. |
| 25. | In the message box to confirm the number of PDF files successfully stamped with a Bates number, verify that the Send these PDFs to CaseMap after closing this message check box is selected, then click Close. |
If you do not select the Send these PDFs to CaseMap after closing the message check box, the documents will be Bates stamp but will not be imported into the case until select the PDF files for import using the Send to CaseMap utility.
| 26. | Complete the steps in the Send PDFs to CaseMap wizard to import PDFs into the case. |
| 27. | In the message box displays the number of records successfully imported into the case, click OK. |
| 28. | Return to the Documents spreadsheet in the case to verify the PDF file import. |
Notice that the Send to CaseMap wizard automatically linked the document record to the PDF source file stored in the network folder.
For more information on using the Send to CaseMap wizard, see Importing PDFs.
|