Printing Annotation Digests

Annotation Digests are ReportBooks that include various components: annotation transcript text, annotation notes, linked issues, and linked files.


TextMap offers three Annotation Digest Reports:

All Annotations — includes all annotations and notes from a set of ReportBooks and can be filtered by issue.
Search Notes — includes search search hits located in transcripts included in the ReportBook. The ReportBook can be filtered by issues linked to the annotations that have notes matching your search.
What's New — includes annotations that have been created on or after a date that you specify. There's an option to include annotations updated since the chosen date.


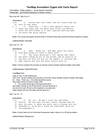
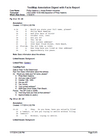
Annotation Digest > All Annotations        Annotation Digest > What's New with linked exhibits and CaseMap facts


Using the Annotation Digest ReportBook Wizard, you can select the transcripts or transcript groups you want to include in the report and modify the order in which you want them to print. You can also customize the order in which you want annotation sections to print, as well as choose whether to include linked CaseMap facts in the report. The default is for all sections to be included in the report. Clear the sections you do not want in your report. Default settings will be restored the next time you want to print the report. Page and line numbers print for all annotations in all reports.

You can also choose to burn in redactions.  This allows you to print the Annotation Digest Reports without disclosing sensitive, redacted, information.


ac_note_icon

Annotation Digests automatically skip any transcripts that do not include annotations. No title page or annotation page will printed for these transcripts. This functionality does not apply to Microsoft Word report options.


Each digest report can be printed or saved as a PDF file using TextMap’s built-in PDF writer (does not require a full Acrobat license). Or you have the option to print the reports directly to Microsoft® Word. See Printing to Microsoft Word.


ac_tip_icon

To view a complete listing of all possible TextMap report and ReportBooks examples, click the link on the ReportBook wizard's Welcome page. Scan the report listing by topic and then click the link for the report example you want to view.


ac_tip_icon

If you are using both TextMap and CaseMap for your case and you want to make annotations first, review the results from TextMap in a hard copy of the PDF and then send selected annotations to CaseMap later.


hmtoggle_plus1To print an Annotation Digest Report with All Annotations
1.On the Reports ribbon, on the Current or Multiple Transcripts Report tab, click Annotation Digest.

You can also click Print on the File menu, and then click Current Transcript.

2.On the Annotation Digest - All Annotations ReportBook Wizard's Welcome page, click Next.
3.On the Select Transcripts page, review the transcripts and transcripts groups you want to include in the report.

Click the Modify button to select or remove transcripts/groups from the report, or change the order that selected transcripts/groups will print in the report.

Select Groups

In the Select Transcripts dialog box, click Transcripts Groups or Transcripts.

In the Available Groups box, select or clear the check boxes for the transcripts or groups you want to include or remove.

In the Selected Transcripts box, click the Up/Down xm_updown_buttons buttons to organize transcripts in the order you want. Click OK to save your changes, then click OK to save your changes.

4.On the Select Transcripts page, click Next.
5.On the Options page, select or clear the ReportBook options you want to include.

See Modifying ReportBook title pages.

6.Click Next.
7.On the Limit Annotations by Issue page, choose one of the following:
Yes, include all annotations.
No, only include annotations linked to the selected issues.

In the Select issues to include box, select the check box next to each issue you want to include.

8.Click Next.
9.On the Annotation Sections page, select or clear the check boxes for the annotation sections you want to include.

Annotation Digest ReportBook > Annotation Sections

Click the Change Order button to modify the order that sections print in the report.

In the Change Order dialog box, click the Move Up and Move Down button to organize the sections in the order you want them to print, then click OK. The Annotation page and line number section cannot be re-organized and will always print as the first section.

10.On the Annotation Sections page, click Next.
11.On the Include Redactions page, choose one of the following:
Yes, to burn in redacted text to the printed report.
No, to not include burned redactions into the printed report.

See Changing page setup options for details on applying the redaction color and reasons.

12.Click Next.
13.On the Linked CaseMap Facts page, choose one of the following:
Yes, include linked facts.
No, do not include linked facts.

To include facts from CaseMap, you must first have the corresponding case open in CaseMap.


ac_note_icon

By default TextMap includes three of CaseMap's Facts spreadsheet fields in reports: Date & Time, Fact Text, and Status. To customize CaseMap fields included in TextMap reports, see the Changing page setup options topic, Steps 8-10.


14.Click Next.
15.On the Completing the Annotation Digest - All Annotations ReportBook Wizard page, click Finish to generate the report.
16.In the Print dialog box, under Destination, click the print output you want.

The print options will change depending on your selection. See Selecting print output options.


ac_tip_icon

We recommend you select Preview first to verify your report before printing a hard copy or saving the report as a PDF file. You can select your print options from the Print Preview toolbar.


17.Select additional print options, then click OK.


hmtoggle_plus1To print the Annotation Digest Report with Search Notes
1.On the Quick Access toolbar, click Print to PDF (File) xm_print_to_pdf_file icon, and then click Annotation Digests.
2.On the Annotations Digests submenu, click Search Notes.

Reports > Multiple Transcripts > Annotation Digest > Search Notes

3.On the Annotation Digest - Search Notes ReportBook Wizard's Welcome page, click Next.
4.On the Select Transcripts page, review the transcripts and transcripts groups you want to include in the report.

Click the Modify button to select or remove transcripts/groups from the report, or change the order that selected transcripts/groups will print in the report.

Select Groups

In the Selected Transcripts dialog box, click Transcripts Groups or Transcripts.

In the Available Groups box, select or clear the check boxes for the transcripts or groups you want to include or remove.

In the Selected Transcripts box, click the Up/Down xm_updown_buttons buttons to organize transcripts in the order you want. Click OK to save your changes, then click OK to save your changes.

1.On the Select Transcripts page, click Next.
5.On the Options page, select or clear the ReportBook options you want to include.

See Modifying ReportBook title pages.

6.Click Next.
7.On the Search Annotation Notes page, type in your search query in the Search For field.

Annotation Digest > Search Annotation Notes

8.Select the type of search you want:
AND - All search terms must appear in the note.
OR - At least one of the search terms must appear in the note.
9.Click Next.
10.On the Annotation Sections page, select or clear the check boxes for the annotation sections you want to include.

Annotation Digest Search Notes > Annotation Sections

Click the Change Order button to modify the order that sections print in the report.

In the Change Order dialog box, click the Move Up and Move Down button to organize the sections in the order you want them to print, then click OK. The Annotation page and line number section cannot be re-organized and will always print as the first section.

11.On the Limit Annotations by Issue page, choose one of the following:
Yes, include all annotations.
No, only include annotations linked to the selected issues.

In the Select issues to include box, select the check box next to each issue you want to include.

12.Click Next.
13.On the Include Redactions page, choose one of the following:
Yes, to burn in redacted text to the printed report.
No, to not include burned redactions into the printed report.

See Changing page setup options for details on applying the redaction color and reasons.

14.On the Linked CaseMap Facts page, choose one of the following:
Yes, include linked facts.
No, do not include linked facts.

To include facts from CaseMap, you must first have the corresponding case open in CaseMap.

15.Click Next.
16.On the Completing the Annotation Digest - Search Notes ReportBook Wizard page, click Finish to generate the report.
17.In the Print dialog box, under Destination, click the print output you want.

The print options will change depending on your selection. See Selecting print output options.


ac_tip_icon

We recommend you select Preview first to verify your report before printing a hard copy or saving the report as a PDF file. You can select your print options from the Print Preview toolbar.


18.Select additional print options, then click OK.


hmtoggle_plus1To print the Annotation Digest Report with What's New
1.On the Quick Access toolbar, click Print to PDF (File) xm_print_to_pdf_file icon, and then click Annotation Digests.

Reports > Multiple Transcripts > Annotation Digests > What's New

2.On the Annotation Digests submenu, click What's New.
3.On the Annotation Digest - What's New ReportBook Wizard's Welcome page, click Next.
4.On the Select Transcripts page, review the transcripts and transcripts groups you want to include in the report.

Click the Modify button to select or remove transcripts/groups from the report, or change the order that selected transcripts/groups will print in the report.

Select Groups

In the Selected Transcripts dialog box, click Transcripts Groups or Transcripts.

In the Available Groups box, select or clear the check boxes for the transcripts or groups you want to include or remove.

In the Selected Transcripts box, click the Up/Down xm_updown_buttons buttons to organize transcripts in the order you want. Click OK to save your changes, then click OK to save your changes.

5.On the Select Transcripts page, click Next.
6.On the Options page, select or clear the ReportBook options you want to include.

See Modifying ReportBook title pages.

7.Click Next.
8.On the What's New Since page, type on the calendar arrow for the Date field to select the date you want.

Annotation Digest Report > What's New Since

9.Select whether to include updated annotations:
Yes, include updated annotations.
No, do not include updated annotations.
10.Click Next.
9.On the Annotation Sections page, select or clear the check boxes for the annotation sections you want to include.

Annotation Digest What's New > Annotation Sections

Click the Change Order button to modify the order that sections print in the report.

In the Change Order dialog box, click the Move Up and Move Down button to organize the sections in the order you want them to print, then click OK. The Annotation page and line number section cannot be re-organized and will always print as the first section.

12.On the Limit Annotations by Issue page, choose one of the following:
Yes, include all annotations.
No, only include annotations linked to the selected issues.

In the Select issues to include box, select the check box next to each issue you want to include.

13.Click Next.
14.On the Include Redactions page, choose one of the following:
Yes, to burn in redacted text to the printed report.
No, to not include burned redactions into the printed report.

See Changing page setup options for details on applying the redaction color and reasons.

15.On the Linked CaseMap Facts page, choose one of the following:
Yes, include linked facts.
No, do not include linked facts.

To include facts from CaseMap, you must first have the corresponding case open in CaseMap.

16.Click Next.
17.On the Completing the Annotation Digest - What's New ReportBook Wizard page, click Finish to generate the report.
18.In the Print dialog box, under Destination, click the print output you want.

The print options will change depending on your selection. See Selecting print output options.


ac_tip_icon

We recommend you select Preview first to verify your report before printing a hard copy or saving the report as a PDF file. You can select your print options from the Print Preview toolbar.


19.Select additional print options, then click OK.


related_topics_buttonRelated Topics


Need additional help? Email the CaseMap Support team at: casemap.support@lexisnexis.com, or contact a support representative at 800.543.6862 (Option 2, then Option 4). The CaseMap Support team is available between the hours of 9:00 a.m. to 7:00 p.m. Eastern Time, Monday - Friday.

© 2018 LexisNexis. All rights reserved.