The Export to iPad Wizard allows you to export case issues, one or more selected transcripts, annotations, and linked exhibits to the iPad. You have the option to email case data to an iPad or save it to a file so you can send it later. Refer to the iPad Export Considerations table for details about exporting transcripts, case issues, linked files, and exhibits.
Reference the following table for considerations when exporting case data to your iPad.
|
| 1. | Open the case that contains the case data you want to export. |
| 2. | On the Home Ribbon, click the Export to iPad button. |
On the File menu, you can also click Export, and then click Export to iPad .
| 3. | On the Export to iPad wizard's Welcome page, click Next. |
| 4. | On the Select Transcripts page, select the transcript(s) you want to include in the export. |

The Include exhibits check box is selected by default to export all exhibits linked to these transcripts. If you want to exclude all exhibits from the export, clear the check box.
| 5. | Click the Modify button to add additional transcripts to the export. |
| 6. | In the Select Transcripts dialog box, in the Available box, select the transcripts or files you want to include and then click the < Item button. |

To include all files, click the << All button.
To include all of the transcripts from a group, select the transcript group and then click the << Group button.
The transcripts now display in the Selected box.
| 7. | Click OK to close the dialog box. |
| 8. | On the Select Transcripts page, click Next. |
| 9. | On the Ready to Send page, select whether to email the file now or to save it to a folder to send later. |

Yes, I want to email the exported file to the iPad now
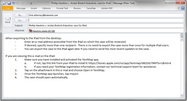
A Microsoft Outlook email displays on-screen with the exported file automatically attached.
You can now type in one or more email addresses to send the case to the appropriate staff members.

Notice that the email includes pre-written content identifying that the attachment is for the TextMap iPad app. The message includes directions for how to import the file using the Mail app on your iPad. You must have the TextMap iPad app installed in order to import the case.
|
No, I want to save the exported file to a folder to send later
| 1. | Once this option is selected, click the Browse button. |
| 2. | In the Select the name and location dialog box, navigate to the network folder where you want to store the exported file. |

| 3. | In the File name box, type in a name for the file. |
The default export file name is the case file name. You can modify the name as needed.
| 4. | Click Save to continue. |
| 5. | On the Ready to Send page, click Next. |
The export file is now saved until you are ready to send it to the iPad.
|
| 10. | On the Completing the Export to iPad Wizard page, click Finish. |
|


