If you find that you are creating the same kind of case over and over, for example, using the same issues, questions, research, and staff, you can save time by using a case template.
Process of working with case templates
Here's the process of working with case templates:
| 1. | Create a case and populate it with the staff, issues, research, and any other data you think you may want to reuse. This will serve as the source case for the template file. |
| 2. | Create a case template file. In this step, you copy the source file into a new template file. You can exclude facts and other record types from being copied from the source file to the template. |
| 3. | Modify the template as needed. Add or remove staff, spreadsheet views, custom fields, reports, and other customizations. |
| 4. | Create a new case based on the template. When you create the new case, you can select which staff from the template you want to include in the new case. |

|
As you create more templates, consider establishing a naming convention for them that will make it easy to recognize which template should be used for a particular kind of case.
|
| 1. | Prepare the case you want to use as the source for the template.
It is easiest if it already contains the issues, questions, staff, custom fields, reports, and other data you want to reuse. However, these can be added to the template after it has been created. |
| 2. | On the FILE tab, click New, and then click Case Template.
 |
CaseMap closes any open case.
| 3. | In the Select source case for creating the template dialog box, browse to and select the CaseMap file you want to use as the source for the template, if it's not already selected, then click Next. |

|
To create the template, CaseMap copies the case into a new template file. The case you select in this step is not changed.
|
| 4. | In the Select directory and provide template name dialog box, do the following: |
| a. | Click Browse and then open the folder where you want to save the template.
By default, templates are saved to a designated Templates folder in the CaseMap installation folder. |
| b. | Type the template name, and then click Save. |
The Select existing records that you want to clear dialog box opens. This is where you can exclude facts and other record types from being copied from the source file to the template.
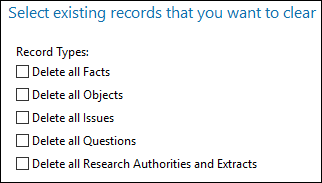
| 5. | Select check boxes for record types you want to exclude from the template, and then click Next. |
| 6. | Verify the case source location and the folder and name for the new template, then click Finish.
CaseMap creates the template and then opens it for editing. |
| 7. | Sign into the case if prompted. |
| 8. | Review the elements of template structure you want to reuse and make changes as needed. For example, these and other items will carry over: spreadsheet views, custom reports, and custom fields.
|
|
| 1. | Click the File tab, click New and then click Local Case. |
| 2. | In the Create New Case dialog box, type in the case name, select the time zone where the new case events occur, then click Next. |
| 3. | In the Select the Template to Use box, click Add, select the template you want to use, click Open, then click Next. |
| 4. | In the Manage Staff Members box, add or remove users, and then click Next. |
| 5. | In the Where do you want to save your file dialog box, do the following: |
| a. | Type in the name for the case File name field. |
| b. | Click Browse, open the folder where you want to save the new case, and then click OK. |
| 6. | Click Finish.
CaseMap creates the new case and then opens it. |
|

