Registering SQL Servers
Once a SQL Server is registered in the CaseMap Admin Console, it is ready to have cases associated with it. Each SQL Server name should be unique and non-case sensitive.
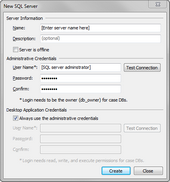
During the server registration process, the Administrative Credentials and Desktop Application Credentials areas require a SQL Server Authentication login account. The SQL Server login account configured for Administrative Credentials should be granted the database owner (dbowner) and database creator (dbcreator) roles. The database owner role is required to successfully perform internal application operations like changing isolation levels and enabling single user mode. The database creator role is required to create new cases directly in the CaseMap Admin Console.
|
If the administrator only wants to register servers (and not create SQL cases) in the CaseMap Admin Console, the database creator role is not needed for that user. |
This should be the SQL Server where you want to host cases. The SQL Server name has a maximum character limit of 128.
The Description field has a maximum character limit of 200.
This login account needs to be the database owner in SQL Server for all cases registered on the server (existing or new). This login should also be the database creator in SQL Server, if this user wants to create cases in the CaseMap Admin Console. The user name has a maximum character limit of 272.
The password has a maximum character limit of 100.
Select the 'Always use the Administrative credentials' check box to use only those credentials when accessing the the server. Optional: Type in the desktop application credentials for the SQL Server client User Name, Password, and Confirm password fields. This login needs read, write, and execute permissions for cases.
You should test the connection for both sets of credentials.
The new SQL Server now displays in the SQL Servers pane.
|

