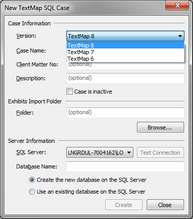
Each CaseMap or TextMap case is stored in its own SQL Server database. You cannot have multiple cases stored in the same database. Each case must have a unique name. You can create new cases as well as register existing cases that you have imported from prior versions of CaseMap or TextMap. See About migrating cases.
You can select the CaseMap or TextMap version you want to use when creating new SQL cases. When you upgrade to a new CaseMap or TextMap version, you can create a new SQL case without having to upgrade all existing cases. The version number displays in the Case Type column in the SQL Cases pane so you can easily identify and sort SQL cases.
| 1. | In the CaseMap Server pane, click SQL Cases. |
| 2. | Click on the New SQL Case button on the toolbar. |
| 3. | In the New SQL Case dialog box, select TextMap SQL. |

| 4. | Next select Create a new SQL case database, then click OK. |
| 5. | In the New TextMap SQL Case dialog box, select a version from the Version field. |

| 6. | In the Case Name field, type in a name for the case. |
The maximum client matter number is 100 characters.
| 7. | In the Client Matter No. field, type in the client matter number (optional). |
| 8. | In the Description field, type in a case description (optional). |
The maximum description is 200 characters.
| 9. | Check the Case is Inactive check box only if the case is inactive. |
| 10. | In the Exhibits Import Folder area, type in the path name to the exhibits folder you want to import, or click Browse (optional). |
| 11. | In the Browse for Folder dialog box, select the file path to the exhibits folder you want, then click OK. |
| 12. | In the SQL Server drop-down listing, select the SQL Server that will host or store this case. |
| 13. | Click the Test Connection button. |
| 14. | In the message box, click OK to confirm the connection. |
| 15. | In the Database Name field, type in the SQL database name. |
The maximum SQL database name is 128 characters.
| 16. | Select whether to use a new database or an existing, empty database: |
| • | Create the new database on the SQL Server |
| • | Use an existing empty database on the SQL Server |
| 17. | Click the Create button to create the case. |
| 18. | In the message box, click Yes to continue. |
The case now displays in the SQL Cases pane.
| 19. | Continue creating SQL cases, as needed, and/or click Close to end. |
|
| 1. | In the CaseMap Server pane, click SQL Cases. |
| 2. | Click on the New SQL Case button on the toolbar. |
| 3. | In the New CaseMap SQL Case dialog box, select CaseMap SQL. |
| 4. | Next select Create a new SQL case database, then click OK. |

| 5. | In the New CaseMap SQL Case dialog box, click the CaseMap version you want to use in the Version list. |
If the Version list is disabled, you can still create SQL cases for the version for which you have permissions granted.
| 6. | In the Case Name field, type in a name for the new SQL case. |
The maximum case name is 100 characters.
| 7. | In the Client Matter No. field, type in the client matter number (optional). |
The maximum client matter number is 100 characters.
| 8. | In the Description field, type in a case description (optional). |
The maximum description is 200 characters.
| 9. | In the Default Time Zone drop-down listing, click on the time zone where most of the case events occur. |
| 10. | In the Template Name field, select the CaseMap template you want to use to create the SQL case. |
The CaseMap Default Template is used if you have not created any CaseMap templates.
For more information, see Creating SQL cases from CaseMap templates.
| 11. | In the SQL Server drop-down listing, select the SQL Server that will host or store this case. |
| 12. | Click the Test Connection button. |
| 13. | In the message box to confirm the connection, click OK. |
| 14. | In the Database Name field, type in the SQL database name if different from the case name. |
The maximum SQL database name is 128 characters.
| 15. | Select whether to use a new database or an existing, empty database: |
| • | Create the new database on the SQL Server |
| • | Use an existing empty database on the SQL Server |
| 16. | Click the Create button to create the case. |
| 17. | In the message box, click Yes to continue. |
The case now displays in the SQL Cases pane.
| 18. | Click Close when you are finished. |
The case now displays in the SQL Cases pane.
|


