| 1. | In the Transcripts pane, select a transcript, and then select the annotation you want to export. |
| 2. | Click More Export on the Home ribbon, and then click Export Annotations. |
On the File menu, you can also click Export, and then click Export Annotations.
| 3. | In the Export Annotations Wizard, click Next. |
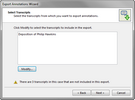
| 4. | On the Select Transcripts page, select the transcripts that have annotations you want to export. |

The transcript now displays in the Transcript pane now displays in the export wizard.
The default transcript is the current, active transcript.
| a) | Click the Modify button to add more transcripts to the export. |
The Select Transcripts dialog box opens.
| b) | In the Available Transcripts box, select the check box beside the transcript you want to add. |
When an item is selected, it is added to the Selected Transcripts area of the Select Transcripts dialog box.
| c) | Optional: Click the Select All check box to add all transcripts in the Available box. |
| d) | Click OK to close the dialog box. |
|
| 5. | Click Next to display the Limit Annotation by Issue dialog box. |

| 6. | On the Limit Annotations by Issue page, select one of the following: |
To include all annotations
| a. | Select the Yes, include all annotations check box to export all annotations. |
|
To include only annotations linked to issues
| a. | Select the No, only include annotations linked to the selected issues check box to include only the annotations that are linked to the issues that are selected here. |
| b. | In the Select issues to include area, select the check box(es) for all annotations to be included in the export. |
|
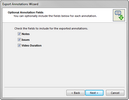
| 7. | In the Optional Annotations Fields dialog box, select the field(s) to be included with the exported annotations: |

Notes -- Include a field to list the note(s) associated with each annotation.
Issues -- Include a field to list the issue(s) associated with each annotation.
Video Duration -- Include a field to list the length of the video clip.
| 8. | Click Next to continue. |
The Output File dialog box opens.
| 9. | Click the Browse button to choose a file name and storage location. |
| 10. | In the Export Annotations dialog box, navigate to the folder where you want to save the .CSV file. |
This folder defaults to the export folder selected in the File Locations tab in the Tools > Options dialog box.
| 12. | In the File Name field, type in a name for the .CSV file, and then click Save. |
| 13. | On the Output File page, click Next to initiate the export. |
The Completing the Export Annotations Wizard displays the number of annotations exported.
| 14. | Optional: Click the hyperlink to view the output file. |
The exported annotations can be viewed in Microsoft Excel. Transcripts display in alphabetical order.

| 15. | Optional: To calculate video clip duration, perform the following: |
Calculating the total video duration is very beneficial when it comes to determining if you are within the allotted time when making presentations.
| a. | In the Completing the Export Annotations Wizard dialog box, click the Click here to open the output file hyperlink. |
The output file opens in Microsoft® Excel®.
| b. | In the Excel spreadsheet, place the cursor below the last entry in the Video Duration column and click the Auto Sum button. |
The total duration time is displayed.
| c. | Save and close the Excel spreadsheet. |
| 16. | Click the Finish button to close the wizard. |
|


