| 1. | In the Navigation pane, click the Exhibits and Video button. |
| 2. | In the Exhibit Tasks pane, click Link exhibits to this transcript to open the Auto Link Exhibit Wizard. |
| 3. | On the Auto Link Exhibit Wizard's Welcome page, click Next. |
| 4. | On the New or Existing Exhibit page, select the option, Yes, I want to link a new exhibit to this case, and then click Next. |
| 5. | On the Document Type page, select the type of document you want to link, and then click Next: |
To add Files, do the following:
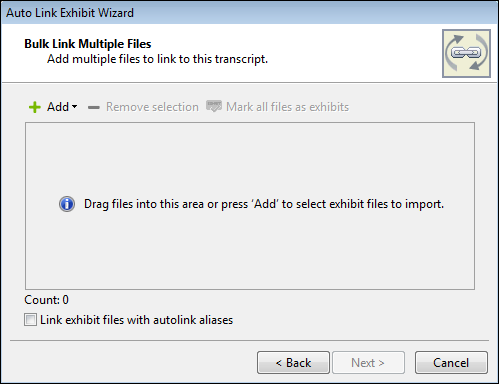
| 1. | On the Bulk Link Multiple Files page, click the Add drop down arrow and then click Add Files. |
| 2. | Navigate to the folder location where the files are saved. |
| 3. | In the Select One or More Exhibits dialog box, select the file(s), and then click Open. |
To Add URLs, do the following:
| 1. | On the Bulk Link Multiple Files page, click the Add arrow and then click Add URLs. |
| 2. | Enter the address of the web page for the new exhibit and then click OK. |
To add files via the drag-and-drop operation, drag your selected files into the specified area on the Bulk Link Multiple Files page.
 To drag and drop a file into TextMap, the file must have one of the following extensions: .txmp, .xm2, and .tm. If the file does not have one of those extensions, complete the following steps: To drag and drop a file into TextMap, the file must have one of the following extensions: .txmp, .xm2, and .tm. If the file does not have one of those extensions, complete the following steps:
| 1. | Open File, click Import and then click Import Transcripts. |
| 2. | Locate the transcript to import and click Select. The Transcript Import Preview dialog box appears. |
| 3. | Ensure all information is correct; click OK. |
|
|
| 1. | On the Connect to CaseMap page, launch CaseMap and open the corresponding case (if you have not already done so), and then click Next. |
| 2. | On the Select CaseMap Object page, select the file(s) you want to link, and then click Next. |

|
| 1. | On the New Exhibit Path page, click Open or Browse to navigate to the folder location where the file is saved, and then click Open. |

| 2. | In the File Viewer list, click the type of viewer you need for the file, and then click Next. |
| 3. | On the New Exhibit Name page, type or edit the file name. |
The contents of the Name box is automatically filled with the file name of the linked file. TextMap searches the transcript for the name and creates a hyperlink to the file at each location.
| 4. | For the question, Is this document an exhibit?, click Yes or No. |
If the document is not an exhibit it will display in the Exhibits pane under Other Linked Documents.
| 5. | On the Found References to Document page, review the number of references found in the transcript. |
If there are no references found, on the No References to Document Found page, type in a word or phrase to link to this document, then click Next. TextMap automatically creates links in the transcript where all instances of the word or phrase is located in the transcript.
| 6. | Determine whether you want to add more words or phrases and select on one of the following: |
| • | Yes, I want to add more words or phrases to auto link. |
| 1. | On the Enter Words or Phrases to Auto Link page, type in a word or phrase to auto link, and then click Add. |

| 2. | In the message box, click OK. |
| 3. | Continue adding words or phrases until finished. |
| • | No, I do not want to add more words or phrases to auto link. |
Skip to Step 7.
|
By default, all files will be marked as exhibits. To change, click  . .
|
If the Exhibit name or Autolink ID need to be modified, click the Exhibit Name or Autolink ID fields to modify. The Autolink ID will update based on the exhibit name.
|

|
Exhibit names and Autolink IDs must be unique and cannot be duplicated.
|
|
If the Link exhibit files with autolink aliases check box is selected, the hyperlink will be created by pairing the Autolink alias with the Autolink ID. If the box is not selected, and there are no Autolink alias names defined, the hyperlink will be created from the Exhibit name.
|
| 7. | On the Completing the Auto Link Exhibit Wizard page, click Finish. |
|