Title and introduction pages can be added to timelines to create a polished work product.
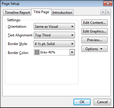
When printing charts, TimeMap automatically includes a title page with a border that can be edited. The title page includes the timeline title, name of the person preparing the timeline, the organization name, date (optional), timeline details (date of first and last fact, and the total number of facts). The timeline title, timeline creator, and organization data is automatically generated if you have already completed the User Information entries (Tools > Options) and added a timeline title. You can choose whether to include page numbers on the printed output.
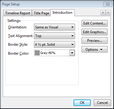
An introduction page can also be added to a timeline to add background information regarding timeline content. Introductions can be one or more pages and can include graphics in the header or footer so you can insert your organization's logo or other relevant graphics.
| 1. | Click File, click Print, and then click Page Setup. |
| 2. | In the Page Setup dialog box, click the Title Page tab. |

| 3. | In the Orientation list, click the orientation setting for the title page: Portrait, Landscape, or Same as Visual. |
| 4. | In the Text Alignment list, click the page location for title page text: Top, Top Third, Middle, Bottom Third, or Bottom. |
| 5. | In the Border Style list, click the width for the title page border. |
| 6. | In the Border Color list, click the color you want for the title page border. |
| 7. | Click the Edit Content button to customize or edit title page text. |
Click the Insert Field button and select any fields you want to add to the title page. You can delete fields too by highlighting the field and the pressing Delete.
Use the format toolbar in the Contents dialog box to customize text or insert a symbol.
| 8. | Click the Edit Graphics button to add a graphic to the header or footer of the title page. |
Click the Header Graphic or Footer Graphic tab, depending on where you want the graphic located.
Click the Load button to navigate to and select the graphic file, then click Open.
In the Position, Size, and Original size areas, adjust the graphic location settings, then click OK.
See Step 7 for how to format text and insert fields.
| 9. | Click the Preview tab to review the graphic's placement. |
| 10. | Click the Options button and select Save as Default to set the title page as a default template for each timeline. |
Click the Load Defaults to clear any selected settings and return to the TimeMap's default settings for the title page.
| 11. | Click OK to close the Page Setup dialog box. |
|
| 1. | Click File, click Print, and then click Page Setup. |
| 2. | In the Page Setup dialog box, click the Introduction tab. |

| 3. | In the Orientation list, click the orientation setting for the title page: Portrait, Landscape, or Same as Visual. |
| 4. | In the Text Alignment list, click the page location for title page text: Top, Top Third, Middle, Bottom Third, or Bottom. |
| 5. | In the Border Style list, click the width for the title page border. |
| 6. | In the Border Color list, click the color you want for the title page border. |
| 7. | Click the Edit Content button to customize or edit title page text. |
Click the Insert Field button and select any fields you want to add to the title page. You can delete fields too by highlighting the field and the pressing Delete.
Use the format toolbar in the Contents dialog box to customize text or insert a symbol.
| 8. | Click the Edit Graphics button to add a graphic to the header or footer of the title page. |
Click the Header Graphic or Footer Graphic tab, depending on where you want the graphic located.
Click the Load button to navigate to and select the graphic file, then click Open.
In the Position, Size, and Original size areas, adjust the graphic location settings, then click OK.
See Step 7 for how to format text and insert fields.
| 12. | Click the Preview tab to review the graphic's placement. |
| 13. | Click the Options button and select Save as Default to set the title page as a default template for each timeline. |
Click the Load Defaults to clear any selected settings and return to the TimeMap's default settings for the introduction page.
| 14. | Click OK to close the Page Setup dialog box. |
|


