Navigating TimeMap
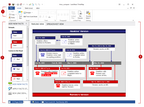
TimeMap's user interface is designed so your timeline chart displays in the primary workspace pane for maximum viewing. This workspace pane is where you will add fact information in facts boxes, add text boxes and pictures or graphics to your timeline. The workspace pane has two views: Timeline View and Spreadsheet View. Timeline View displays your timeline in visual graph form as you would present it to an audience. Spreadsheet View displays your timeline elements in spreadsheet rows so you can view text content, dates, and any linked files easily.
To assist you in customizing your timeline elements, you will use the navigation pane on the left side of the application. The navigation pane has two interchangeable panes: Add New Facts and Box Line Defaults. Clicking on the Apply Facts Styles bar allows you to apply formatting styles to fact boxes.
The Ribbons (Home, Time Scale and View) contain menu items and other commands for performing TimeMap tasks. Two additional ribbons (Box Tools and Spreadsheet Tools) contain menus and buttons for fact management and formatting options. See About TimeMap menus for additional information.
The Standard Toolbar contains buttons that let you add and format delete fact and text boxes, adjust the time scale, format fonts and dates, access box properties, and more. Some buttons only activate with certain spreadsheets. The Navigation pane runs vertically along the left side of TimeMap and provides access to two different panes: Add New Facts and Box Line Defaults. Click on the Navigation bars at the bottom of the pane to access each set of tools. Add New Facts — The Add New Facts pane displays a variety of pre-formatted fact box styles you can use and also lists any custom styles you have created. For more information, see Using the Fact Design Gallery. Apply Fact Styles — Click the Apply Fact Styles bar to toggle this tool on or off. When the bar is highlighted, select the fact or text box for which you want to change a style, click on a style in the Fact Design Gallery, then click OK in the message. Box Line Defaults — The Box Line Defaults pane allows you to modify the default styles applied to new fact and text boxes. For more information, see Using the Fact Design Gallery.
Displays your timeline in either Timeline or Spreadsheet view. These views are where you will enter, modify, and track your timeline data. |
||||||
|

