Creating custom ReportBooks

Given the pre-built selections available, you may find there is no need to create your own ReportBook. If you do want to define you own ReportBook layouts, you can simply create one from scratch or by copying an existing ReportBook template and modifying it to suit your needs. Both options are available on the Reports ribbon by clicking ReportBooks and then clicking Manage ReportBooks.

Each custom ReportBook must contain at least one report. Once the ReportBook is created you can add more reports, delete, rename, modify, copy, and adjust the order of the reports included in it. All ReportBooks created in the case display in the Manage ReportBooks dialog box with the date and user name who created them. All ReportBooks are available for use by all users in the case.


Custom ReportBooks can be created in following ways:

Copy and modify a pre-existing ReportBook
Add a report from a pre-existing ReportBook to another ReportBook
Add a custom report to a pre-existing ReportBook
Create a custom ReportBook


ac_tip_icon

If you have a custom ReportBook template you want to add to another case, you can export a copy of it and then import it into the other case.


hmtoggle_plus1To copy a pre-existing ReportBook
1.On the Reports menu, click ReportBooks and then click Manage ReportBooks.
2.In the Manage ReportBooks dialog box, click the ReportBook you want to copy in the Available ReportBooks box.
3.Click the Copy button.

Notice that a copy of the selected ReportBook now displays in the Available ReportBooks box with "Copy of" in the title.

You can now rename the ReportBook and modify it, as needed, to create a customized ReportBook.

hmtoggle_plus1To modify a pre-existing ReportBook
1.On the Reports menu, click ReportBooks and then click Manage ReportBooks.
2.In the Manage ReportBooks dialog box, click on the ReportBook you want to modify in the Available ReportBooks box.
3.Click the Modify button.
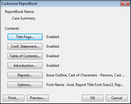
1.In the Customize ReportBook dialog box, click on the Title Page button to modify content, graphics, and settings.

New ReportBook Wizard > Edit ReportBook

2.In the Settings area:
Select the Enabled check box to use CaseMap's default title page layouts.
In the Orientation listing, click whether you want Portrait or Landscape.
In the Vertical Alignment listing, click on the alignment option you want: Top, Top Third, Middle, Bottom Third, Bottom.
In the Border Style listing, click the point size for the border width.
In the Border Color listing, click the color scale you want to use.
Select check boxes to include Print Date and Time, Print Page Number, and Include Graphics.
3.Click the Edit Content button to modify the content that prints on each page, including typing or pasting text, modifying the font size and color, adjusting text alignment, inserting symbols or specific fields.
4.Click the Edit Graphics button to preview current graphics, and modify the header and footer graphic settings. You can also remove, load, and save graphics for title pages.
5.Click the Preview button to review changes you make before saving and printing the report.
6.Click the Options button to save settings as your default or to load CaseMap's default settings.


ac_note_icon

Changes to graphics affect all users and all reports in the case.


To modify the confidentiality statement

1.In the Customize ReportBook dialog box, click the Conf. Statement button.
2.In the Edit ReportBook Confidentiality Statement dialog box, click the Edit Content button.
3.In the Edit ReportBook Confidentiality Statement Content window, modify text as well as font size and style, symbols, and fields using the toolbar buttons.
4.Click OK to save the changes.
5.In the Edit ReportBook Confidentiality Statement dialog box, modify additional preferences in the Settings area that you want applied to the confidentiality statement page.

Settings made here only affect the confidentiality statement and not changes made to the same settings when you click the Title Page or Introduction buttons.

For more information on each setting, see Step 4.

6.Click the Preview button to review your changes.
7.Click OK to save the changes.

To modify the table of contents

1.In the Customize ReportBook dialog box, click the Table of Contents button.
2.In the Edit ReportBook Table of Contents dialog box, click the Edit Content button.
3.In the Edit ReportBook Table of Contents Content window, modify text as well as font size and style, symbols, and fields using the toolbar buttons.
4.Click OK to save the changes.
5.In the Edit ReportBook Table of Contents dialog box, modify additional preferences in the Settings area that you want applied to the table of contents page.

Settings made here only affect the table of contents page and not changes made to the same settings when you click the Title Page or Conf. Statement buttons.

For more information on each setting, see Step 4.

6.Click the Preview button to review your changes.
7.Click OK to save the changes.

To modify the introduction

1.In the Customize ReportBook dialog box, click the Introduction button.
2.In the Edit ReportBook Introduction dialog box, click the Edit Content button.
3.In the Edit ReportBook Introduction Content window, modify text as well as font size and style, symbols, and fields using the toolbar buttons.
4.Click OK to save the changes.
5.In the Edit ReportBook Introduction dialog box, modify additional preferences in the Settings area that you want applied to the introduction page.

Settings made here only affect the introduction page and not changes made to the same settings when you click the Title Page or Conf. Statement buttons.

For more information on each setting, see Step 4.

6.Click the Preview button to review your changes.
7.Click OK to save the changes.

To modify reports

1.In the Customize ReportBook dialog box, click the Reports button.
2.In the ReportBooks Reports dialog box, select or clear check boxes for the reports you want to include in the ReportBook.

ReportBook Reports dialog box


ac_note_icon

To modify or edit a report within a ReportBook, click the Modify button to change fields, sort order, filters, groups, and print options for the report. Click the Rename button to change the report name within the ReportBook.


3.Click OK to save the changes.

To modify options

1.In the Customize ReportBook dialog box, click the Options button.
2.In the ReportBook Options dialog box, review the name in the ReportBook Name area.

ReportBook Options dialog box

3.In the Contents area, click the Fonts button to modify the font type and size for the title page and body content, then click OK.
4.Click the Paper Settings button to select the paper size and printer tray, then click OK.
5.Click the Report Settings button to review the report confidentiality statement and select or clear check boxes to include a report title, subtitle, date and time, confidentiality statement, author/scribe short names, and page numbers.

ReportBook Options dialog box

6.Click OK to save the changes.
7.Click the Report Title Pages button to modify settings for the ReportBook title page, then click OK.

For more information on these settings, see Step 4.

8.In the ReportBook Options dialog box, click OK to continue.
9.In the Customize ReportBook dialog box, click OK to save changes to all reports within the ReportBook.
10.In the Manage ReportBooks dialog box, click Close when you are finished modifying this ReportBook.
hmtoggle_plus1To add a report from a pre-existing ReportBook to another ReportBook
1.On the Reports menu, click Tools, and then click Create Report from Existing ReportBook.
2.In the message box, click OK to continue.
3.In the Select a ReportBook dialog box, select the ReportBook that contains the report you want to copy, then click OK.

Select a ReportBook dialog box

5.In the Select a ReportBook Report dialog box, select the report you want, then click OK.

Select a ReportBook Report dialog box

6.In the Select a ReportBook dialog box, select the ReportBook you want to copy the report into, then click OK.
7.In the New ReportBook Report dialog box, use the Move Up and Move Down buttons to organize the new report in the ReportBook, then click OK.
8.In the message box confirming the new report addition, click OK.
hmtoggle_plus1To add a custom report to a pre-existing ReportBook

Before creating a custom report to add to a pre-existing ReportBook, first arrange your spreadsheet fields in the order you want them to display in the report and insert/hide any fields, as needed. You may also want to run a filter on a spreadsheet to remove records or data that you do not want to include.

Once your spreadsheet view is adjusted for the report layout, use the Create Report from Current View template. By using this utility, the ReportBook is generated with the new report added in your selected order. When other case staff print this ReportBook, the new report is automatically included in it for their use too.


ac_note_icon

When creating a report from the Create Report from Current View utility, CaseMap is making a one-time snapshot of the spreadsheet view to create the report. Any changes made to the spreadsheet after using this tool do not impact the ReportBook report you just created.


1.In the Case Shortcuts pane, click on the icon for the spreadsheet you want to use.
2.Arrange the spreadsheet in the view you want and filter any records as needed.
3.On the Reports menu, click Tools, and then click Create ReportBook from Current View.
4.In the message box, click OK.
5.In the Select a ReportBook dialog box, click on the ReportBook you want to use and click OK.

Select a ReportBook dailog box

7.In the New ReportBook Report dialog box, type in a title for the new report, then click OK.

New ReportBook Report dialog box

8.Click the Move Up or Move Down buttons to arrange the print order for this report within the ReportBook, then click OK.
9.In the message box indicating that the ReportBook is saved, click OK.
10.To preview the ReportBook, click the Reports menu and then click ReportBooks.
11.Click the ReportBook you selected in the utility and then click Preview.
12.When the new report is generated, navigate to the ReportBook Contents page to locate the new report that you added.

You can now print the report using the method that suits your needs.

For more information, see Printing pre-built ReportBooks.

hmtoggle_plus1To create a new custom ReportBook
1.On the Reports menu, click ReportBooks and then click Manage ReportBooks.
2.In the Manage ReportBooks dialog box, click the New button to open the ReportBook utility.
3.In the Add Report(s) to the ReportBook dialog box, click the Click here to Add a Report button.
4.In the New ReportBook Report dialog box, select the case data type for this report, then click Next.

New ReportBook Wizard > New ReportBook Report > Data Type

5.In the New ReportBook Report dialog box, select the template you want to use and expand the listing by clicking the right-arrow cm_right-arrow.

New ReportBook Wizard > New ReportBook Report > Template

6.Click the cm_right-arrow to expand the template listing and make additional specifications, such as filtering aspects of this report, selecting specific fields, adjusting the sort order, and more, then click Next.
7.In the New ReportBook Report dialog box, expand the selections as appropriate, select a template, and click Next to continue.
8.Type in a name for the report.

New ReportBook Wizard > New ReportBook Report > Title Name

9.Select Open "Customize Report" after the report is created to preview the report later.
10.Click Finish to continue.
11.In the Edit Report dialog box, click the Fields button to add/remove fields.
12.In the Customize Report Fields dialog box, add or remove fields from in the Visible Fields box and organize the field order by clicking the Move Up and Move Down buttons , as needed.

New ReportBook Wizard > Customize Report Fields

13.Click Close to continue.

In the Edit Report dialog box, click on the Sort Order button to sort the spreadsheet data in a specific order, then click OK.

New ReportBook Wizard > Customize Report Sort Order

For more information, see Sorting multiple fields.

In the Edit Report dialog box, click the Filter button to add/remove a spreadsheet filter, then click OK.
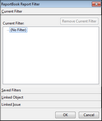
New ReportBook Wizard > ReportBook Report Filter

Click the Current Filter bar to display active filters for the selected spreadsheet. Select the filter and click the Remove Current Filter button to delete the active filter.
Click the Saved Searches bar to use a filter that is already created.
Click the Linked Object bar to only include records that are linked to selected objects, and additionally that are in selected fields.
Click the Linked Issue bar to select an issue to use an a filter for the report. Select the Include sub-issues check box, if you want this option.

In the Edit Report dialog box, click the Group button to select whether to group spreadsheet records by issue or object, then click OK.

New ReportBook Wizard > Edit Group

If you select Group by Object links, click on an object spreadsheet to group the records by object type.
In the Options area, select check boxes to indicate whether you are skipping empty detail fields and records with no links. In the Max Lines Per Field, type or click on the number of maximum lines to include in the report.
In the Contents area, click the Fields button to add any hidden fields to the report. If you are grouping records by issue links, click the Filter button to select which issues to use as a filter. If you are grouping records by object, the Filter button is unavailable.

In the Edit Report dialog box, click the Options button to select report print options, then click OK.

New ReportBook Wizard > Report Options

In the Scaling area, select whether you want normal scaling, to shrink field widths, or to shrink the font size.
In the Orientation area, select whether you want portrait or landscape.
In the Misc. area, select whether to include gridlines, page breaks by rows, and enter the number of repeat fields you want to allow.
Click the Options button to save these settings as your default print options or to load CaseMap's default settings.
18.In the Edit Report dialog box, click the Preview button to review the ReportBook before printing, then click Close.

You may also print the report directly from the Print Preview window.

19.Click the Print button to select the printer destination and additional print settings, then click OK.
20.Click OK to close the ReportBook utility when you are finished.
21.Click OK to return to the ReportBook utility.
22.In the Add report(s) to the ReportBook dialog box, continue creating additional custom reports (following the steps outlined above) to add to your custom ReportBook, then click Next.
23.In the Choose pages and modify report options dialog box, select the check boxes for the title pages you want to include in the ReportBook.

Click the Click here to Modify Report Options button to open the Edit ReportBook Title Page dialog box.

New ReportBook Wizard > Edit ReportBook

In the Settings area:

Select the Enabled check box to use CaseMap's default title page layouts.
In the Orientation listing, click whether you want Portrait or Landscape.
In the Vertical Alignment listing, click on the alignment option you want: Top, Top Third, Middle, Bottom Third, Bottom.
In the Border Style listing, click the point size for the border width.
In the Border Color listing, click the color scale you want to use.
Select/clear check boxes to include Print Date and Time, Print Page Number, and Include Graphics.
Click the Edit Content button to modify the content that prints on each page, including typing or pasting text, modifying the font size and color, adjusting text alignment, inserting symbols or specific fields.
Click the Edit Graphics button to preview current graphics, and modify the header and footer graphic settings. You can also remove, load, and save graphics for title pages.
Click the Preview button to review changes you make before saving and printing the report.
Click the Options button to save settings as your default or to load CaseMap's default settings.


ac_note_icon

Changes to graphics affect all users and all reports in the case.


25.Click Next to continue.
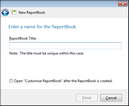
26.In the Enter a name for the ReportBook dialog box, type in a unique name for the custom ReportBook.

New ReportBook Wizard > Name ReportBook and Finish

27.Click the Finish button to generate the ReportBook.

The new ReportBook now displays in the Available ReportBooks box in the Manage ReportBooks dialog box.

Notice that the number of reports within the ReportBook and who it was created by are also displayed.

28.In the Manage ReportBooks dialog box, click Close when you are finished.


related_topics_buttonRelated Topics


Need additional help? Email the CaseMap Support team at: casemap.support@lexisnexis.com, or contact a support representative at 800.543.6862 (Option 2, then Option 4). The CaseMap Support team is available between the hours of 9:00 a.m. to 7:00 p.m. Eastern Time, Monday - Friday.

Copyright © 2019 RELX, Inc. All rights reserved.