| 1. | Open the CaseMap SharePoint Web Parts site. |
| 2. | Click on the case tab for which you want to display the case link. |
| 3. | Click on the Site Actions button  in the upper right corner and then click Edit Page. in the upper right corner and then click Edit Page. |
| 4. | The Edit Content page displays with the web part page template for you to edit. |
| 5. | Click on the Add a Web Part link in the web part zone where you want the case link to display. |

| 6. | In the Add Web Parts dialog box, scroll down to the All Web Parts section until you find the Miscellaneous settings. |

The new CaseMap - Case Link web part displays in the area you designated. You now need to edit the web part so that the hyperlink displays in it.
| 8. | In the new CaseMap - Case Link web part, click the Edit button. |

| 9. | Click Modify Shared Web Part. |
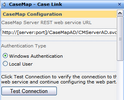
The CaseMap - Case Link panel now displays to the right.
| 10. | In the CaseMap - Case Link panel, type in the URL for the CaseMap Server REST web service. |

For example, for Windows authentication: http://[server:port]/CaseMapAD/CMServerAD.svc
For simple authentication: http://[server:port]/CaseMapLA/CMServerLA.svc
If you click Local User, then enter your user name and password.
| 11. | Click the Test Connection button to verify the connection to the web service and the CaseMap Server. |
When the connection is established, a CaseMap Case field displays.
| 12. | In the CaseMap Case list, click on the case for which you want to display a hyperlink. |

| 13. | In the Link Text field, the case name automatically displays. |
You can edit the case name for how it will display as a hyperlink.
| 14. | In the CaseMap Application Path field, type in the full path to the CaseMap.exe file. |
The default path is C:\Program Files\Casesoft\CaseMap9\CaseMap.exe.
You can edit this path. The text should default to the case name.
| 15. | In the Appearance section, click in the Title field, if you want to edit the case link title that displays at the top of the web part zone. |
| 16. | Click the Ellipses button  . . |
The default name is CaseMap - Case Link.
| 17. | Click OK to save your changes. |
| 18. | Click the Apply button to view your changes without closing the pane. |
| 19. | Click OK to save your changes and close the pane. |
The case link now displays in the CaseMap - Case Link web part.
| 20. | On the SharePoint toolbar, click the Publish button  to publish the link on the case page so case staff can now view it. to publish the link on the case page so case staff can now view it. |
To customize spreadsheet data display, see Customizing data display.
|


