About TextMap menus
TextMap's Menu bar (now referred to as the Main Ribbon) is located at the top left of the TextMap screen. Click on each ribbon (e.g., Home) to access the menus/commands, each providing additional functionality in TextMap.

The commands on each menu affect the transcript currently in view. Some options will give you an arrow that opens a submenu of additional tools. Most of the commands also have corresponding keyboard shortcuts. See Using keyboard shortcuts.
The File menu contains menu items useful in getting started and accessing your case, such as New Case, Open Case, Open SQL Case, Close Case, and Exit. The File menu also has options for importing data from other applications, exporting case issues, transcripts, annotations, and linked exhibits, changing report options in the Page Setup dialog box, creating a replica and synchronizing data from a replica case with the master file. Print and Print Preview options are also listed on this menu. And you can view case properties too.
|
The Home ribbon contains menu items for copying transcript text in the Transcript window, finding text in the current transcript using the Find dialog box, and navigating directly to a page and/or line within the selected transcript using the Go To dialog box. The Home ribbon provides you with import and export capabilities, to include the ability to add new annotations, facts and redactions with access to CaseViewNet®. |
| Reports ribbon |
The Reports ribbon contains menu items for printing transcripts using the Transcript Listing tab. There is also a command for printing the TextMap Transcript Listing report, which displays the list of transcripts in each case. The Search Reports submenu contains menu items for generating and printing a Search Report for the current search results or creating a new search and printing the search results for the new search. |
| Transcripts ribbon |
The Transcripts ribbon contains menu items for selecting the transcript to display, creating and maintaining transcript groups, linking exhibits to transcripts, renaming, deleting, updating, and appending transcripts, adding transcripts to a transcript group, as well as sending transcripts to CaseMap and/or Sanction. The Send To CaseMap option allows you to send transcripts to CaseMap, whereas the Advanced CaseMap submenu allows you to update the transcript in CaseMap, show the linked CaseMap record detail, navigate to the linked CaseMap record in CaseMap. The Transcripts ribbon also provides you with the ability to send transcripts to include Media clips directly to Sanction. |
| Case Tools ribbon |
The Case Tools ribbon contains menu items for managing linked exhibits, exhibit autolink aliases, and TextMap utilities. Per one of the utilities, the Case Index submenu, you are allowed to rebuild the case index, view linked exhibit index and OCR status, disable/enable OCR processing, and manage the Case Ignore Words list. Other utilities allow you to optimize the case, change annotation owners, and also provides access the LexisNexis Expert Research On-Demand web site. |
The View ribbon contains menu items for modifying the TextMap user interface based on your viewing preference. From the View ribbon, you can change the arrangement/sort order of transcripts, choose whether to display all transcripts (i,.e., groups), manage transcript font size and transcript properties, show/hide the Navigation, Annotation, and annotation highlights in the Transcript window, and determine which pane (e.g., Transcripts) is currently displayed in the Navigation pane. With the Filter Annotations tab, you can filter annotations by creator or linked issues.
|
The Create & Edit ribbon appears when there is transcript text focus, or when an annotation or transcript text has been selected. It is accessed from the Text & Video Tools ribbon and contains menu items for copying transcript text in the Transcript window, finding text in the current transcript using the Find dialog box, and navigating directly to a page and/or line within the selected transcript using the Go To dialog box. From the Create & Edit tab, you can also manage videos, navigate, create and edit annotations.
|
The Options ribbon appears when there is transcript text focus, or when an annotation or transcript text has been selected. It is accessed from the Text & Video Tools ribbon and contains menu items for:
|
The Search ribbon appears when there is an active search and contains menu items for navigating between search hits in the selected transcript, creating reports, saving, editing, and canceling the current search. The Search Reports ribbon's Search Report menu item launches the Search Report Wizard to generate and print a Search Report. |
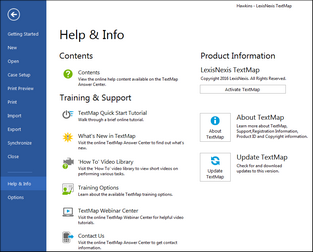
The Help menu which is accessed from the File menu provides access to the TextMap Answer Center as well as a variety of other reference materials. From this menu, you can also reference your TextMap license and registration information, activate the software, and check for Web updates of the software, to include access to TextMap Training and Support information.
|


