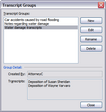
TextMap can hold hundreds or even thousands of transcripts, depending on the size of your case. TextMap allows you to create transcript groups for sets of transcripts that may be similar in content. Transcript groups make searching easier and enable focused searching.
Each transcript group must have a unique name to identify it. Transcript group names are not case sensitive and can be up to 255 characters with no leading or trailing punctuation. Each transcript group must include at least one transcript.
Once created, you can edit, rename, and/or delete transcripts groups. Although a transcript group can be deleted, the transcript(s) is/are not removed from the case, but instead, no longer grouped. TextMap only supports deleting one transcript group at a time.
When searches are performed, you can select either transcript groups or specific transcripts to filter (narrow your search), but not both for a single search.
To display groups in the Transcripts pane, click on the Arrange By header and click Show Groups. See Sorting transcripts.

|
You can also create transcript groups for reporting if you find yourself repeatedly running the same reports on the same set of transcripts. When you create a transcript group simply name that group with a heading that reflects the report you are printing.
|
| 1. | On the Transcripts menu, click Transcript Groups. |
| 2. | In the Transcripts Groups dialog box, click the New button. |
| 3. | In the Select Transcripts for New Group dialog box, select the transcripts in the Available box that you want to add to a group. |

Transcripts display in alphabetical order.
| 4. | Click Item or All to move the selected transcripts into the Selected box. |
| 6. | In the New Transcript Group Name dialog box, type in a meaningful name for the transcript group, then click OK. |
The new group now displays in the Transcripts Groups box.

The Group Detail area displays the name of the person who created the group and the included transcripts.
| 7. | Click Close when you are finished. |
|
| 1. | On the Transcripts menu, click Transcript Groups. |
| 2. | In the Transcripts Groups dialog box, select the transcript group you want to edit, then click the Edit button. |
| 3. | In the Select Transcripts dialog box, select the transcripts you want to edit. |
| • | Select transcripts in the Selected box that you want to remove from the transcript group. |
| • | Select transcripts in the Available box that you want to add to the transcript group. |
Click the Item or All buttons to move transcripts between the two boxes.
| 4. | Click OK to save your changes. |
| 5. | Click Close when you are finished. |
|
If you want to add a transcript to a group directly from the Transcript pane (e.g., Unassigned area):
| 1. | Select/highlight a transcript on the Transcript pane. |
| 2. | Perform one of the following: |
| • | On the Transcript menu, click Add Transcript to Group, and then select the group from the submenu list that the transcript will be added to. |
| • | Right-click on a transcript in the Transcript pane, click Add Transcript to Group, and then select the group from the submenu list that the transcript will be added to. |

|
There will be no system response if you attempt to add a transcript to a group where it already exists.
|
The transcript now displays in the new group.
|
| 1. | On the Transcripts menu, click Transcript Groups. |
| 2. | In the Transcripts Groups dialog box, select the transcript to be renamed and click Rename. |
| 3. | In the Rename Transcript Group dialog box, type in the new name, then click OK. |
| 4. | Click Close when you are finished. |
|
| 1. | On the Transcripts menu, click Transcript Groups. |
| 2. | In the Transcripts Groups dialog box, select the transcript group you want to delete, then click Delete. |
| 3. | In the message box to confirm the action, click Yes. |
The transcript group is now deleted from the case.
| 4. | Click Close when you are finished. |
|


