| 1. | First synchronize the replica with the master case. |
| 2. | Identify the new linked documents that were added to the folder of documents on the computer where the replica resides. |
To identify linked document
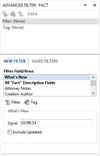
| a. | On the Home tab, click the Sort & Filter button, and then select Advanced Filter to display the Advanced Filter Document pane. |

| b. | In the Filter Field/Area, use the scroll bar to locate/click on Linked Issues. |
| c. | In the Text box, enter the search text. |
| d. | In the Options box, select a parameter to meet your needs, and then click the Filter button. |
| e. | In the message box, click OK to continue. |
|
| 3. | Right-click on the drive letter and then click Filter by Selection. |
| 4. | On the Tools menu, click Linked Files. |
| 5. | On the shortcut menu, click Batch Processing, and then click Copy Linked Files. |
| 6. | In the Batch Processing - Review Linked Files dialog box, review the linked files you are about to copy, then click OK. |

| 7. | In the Browse for Folder dialog box, navigate to the folder destination where other cases are stored and where you want to copy the files, then click OK. |
| 8. | In the message box to confirm the linked files to copy, click Yes. |
| 9. | In the message box to confirm that copies were made, click Yes. |
| 10. | In the Case Shortcuts pane, click the icon for the object or research spreadsheet that is applicable to documents being copied. |
You must be on the All Objects, Research - Authorities, or Research - Extracts spreadsheet when running the Change Linked File Paths utility.
| 11. | On the Tools menu, click Linked Files, and then click Change Linked File Paths. |
| 12. | In the message box to change the linked file paths, click OK. |
| 13. | In the Select Path dialog box, select the file path used when a copy of the files was taken offline, then click OK. |
| 14. | In the message box, click OK to browse to the new location for the linked files. |
| 15. | In the Browse for Folder dialog box, navigate to the directory location you want for the linked files, then click OK. |
| 16. | In the message box, verify your old and new path selections, then click Yes. |
| 17. | In the message box to confirm the file path change, click OK. |
The documents added in the replica are now added to the master case. The linked documents are now copied to the directory location where other case documents are stored and where all users can access them.
|


