Auto-numbering records

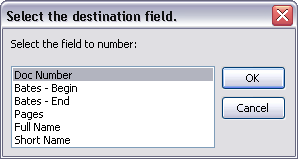
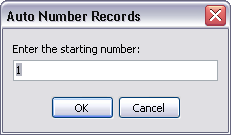
The Auto Number Records utility sequentially numbers the records in the current spreadsheet using a specified starting number and increment. You need to have a number (integer) or text field in the spreadsheet before you can use this feature. We recommend that you create a new text field in the spreadsheet to accommodate auto-numbering needs.

Any data in the selected destination field will be overwritten. For example, if you decide to auto-number records using the Bates - Begin field and those records are Bates stamped, then the auto-numbering format will overwrite the Bates numbers.


ac_caution_icon

We recommend you make a backup copy of the case before making any global changes, like auto-numbering records in select fields. Once the process is completed, you cannot undo the changes without restoring a backup copy of the case.


hmtoggle_plus1To auto-number records in a spreadsheet
1.In the Case Shortcuts pane, click the icon for the spreadsheet you want to use.
2.Create a new text field in the spreadsheet for the new numbering format.

For more information, see Creating custom fields.

3.Filter records to include only those that you want to apply the new numbering format to.
4.On the Case Tools ribbon, click Update Records, and then click Auto Number Records.
5.In the message box, click OK.
6.In the Select the destination field dialog box, select the field to number, then click OK.

CM_select_destination_field_box

All text fields in the spreadsheet will display in this dialog box. Be certain to select a text field that does not contain data that may be overwritten with the new numbering format.

7.In the Auto Number Records dialog box, type in the starting number you want, then click OK.

CM_auto_number_records

8.In the next Auto Number Records dialog box, type in the increment number, then click OK.
9.In the next Auto Number Records dialog box, type in the total number of digits, then click OK.

The minimum total number of digits is 5.

10.In the next Auto Number Records dialog box, type in the prefix or leave the field blank for no prefix, then click OK.
11.In the message box to confirm the numbering process, click Yes.

Remember that data in the selected destination field will be overwritten with the new auto numbering format.

12.In the message box to confirm process completion, click OK.
13.Case records in the spreadsheet view now include the new numbering format in the field you selected.


related_topics_buttonRelated Topics


Need additional help? Email the CaseMap Support team at: casemap.support@lexisnexis.com, or contact a support representative at 800.543.6862 (Option 2, then Option 4). The CaseMap Support team is available between the hours of 9:00 a.m. to 7:00 p.m. Eastern Time, Monday - Friday.

Copyright © 2019 RELX, Inc. All rights reserved.