The Import Linked Files Wizard guides you through the process of importing one or more documents/files into your case. The wizard will create a new record for each file you select to import. You can select one or more files, or a folder of files to import. If a folder contains sub-folders, all files in each sub-folder will be selected for the import as well. CaseMap also allows you to specify the source of the files that are imported.
CaseMap recognizes duplicate documents imported from the same folder. However, if you have the same document stored in two folders, CaseMap will not recognize the duplicate and will create a new record and link to it in the other folder location.
You can choose the option to capture document metadata during the import process. This provides an automated process to extract metadata and map the information automatically into an object spreadsheet. For any unmapped data, you have the option to create a load file, import into a pre-existing field, or ignore.

|
CaseMap does not automatically create fields for metadata import.
|
You can choose to remove files during the import, particularly if a file seems too large. Large files will slow the import process during a bulk import.
You can cancel the import at any time. CaseMap will send a message indicating how many files were successfully imported before the process was canceled.
After the import, CaseMap indexes all new file content. You can begin searching the updated case data as soon as the index process completes. For more information, see About the case index.
You can import the following file types:
| • | Microsoft Office files (.doc, .docx, .xls, .xlsx, .ppt, .pptx, .eml) |
| • | Image files (.tiff, .tif, .gif, .jpg, .jpeg, .bmp, .emf., and .wmf) |

|
Once a file has been imported to the Documents spreadsheet, click the paperclip icon once to display the link/path to the object record. If you double-click on the paperclip icon, the object record opens.
|
| 1. | On the File menu, click Import and then click Import Linked Files from a Folder. |
| 2. | In the Import Linked Files dialog box, click one of the following: |
| • | Add Files to select one or more files to import |
| • | Add Folder to import all files within a folder |

|
CaseMap identifies duplicate files based on directory paths. If a file in a folder has already been added to the case, the document will be skipped during the import process. If you have a file stored in two folders, CaseMap will not recognize the duplicate and will create a new record and link to it in the other folder location.
|
| 4. | In the Import Linked Files dialog box, navigate to the folder where the files are saved. |
If you selected Add Folder, you will navigate to the folder when the Browse for Folder dialog box displays.
If the folder contains subfolders, click Yes in the message box to import all files in each subfolder.
The files now display in the Selected files box.
| 6. | Review the selected files to ensure that you want to import them. |
If you want to delete one or more files selected for the import, click the Remove Files button.
If you want to delete all files selected for the import, click the Remove All button.

| 8. | In the Spreadsheet drop-down list, select the spreadsheet for which you want to import the files. |
| 9. | In the Would you like to identify a source for the files? area of the dialog box, click Yes to identify the source of the files, or click No if you do not want to identify the source of the files. |
| 10. | In the Would you like to extract Metadata for the imported files? area of the dialog box, click Extract to extract metadata, or click Do not extract if you do not want to extract the metadata. |
|
Any files in use or access denied will not have the metadata extracted when imported into CaseMap. Close all files and grant permissions before import.
|
|
CaseMap supports file imports up to 1GB per file. If the file size is larger than 1GB, you might encounter system errors.
|
| 11. | Perform one of the following: |
If you clicked Yes to identify a source for the files, click Next to continue.
If you clicked No, proceed to Step 18.
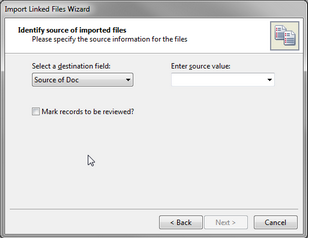
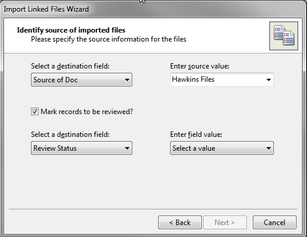
| 12. | In the Select a destination field box, use the drop-down arrow to select the destination field. |

| 13. | In the Enter field value box, use the drop-down arrow to select/enter a source value up to a maximum of 35 characters. |
| 14. | Optional: Select the Mark records to be reviewed? check box to identify records that are to be reviewed. |
If the Mark records to be reviewed check box is selected, the 'Select a destination field' is displayed.

| 15. | In the Select a destination field dialog box, Select Field has been entered as the default value. Use the drop-down arrow to select the destination field. |
| 16. | In the Enter field value box, enter/type in a field value. |
| 17. | Click Next to continue. |
| 18. | In the Verify your selections before importing the files dialog box, review the files and spreadsheet you selected for the import. |

|
If you have chosen to extract the metadata from the files to be imported, the metadata will be extracted and added to the selected spreadsheet. Any metadata that has a data type mismatch is not imported.
|
| 19. | Click Next to initiate the import process. |
| 20. | If you have chosen to extract the metadata and there is unmapped data, the What do you want to do with unmapped metadata? dialog box appears. |
Perform one of the following options:
| • | Create load file of all metadata for the unmapped metadata records |
| • | Import unmapped metadata into a pre-existing field |
| • | Ignore unmapped metadata from being imported |
|
If you select the option to import unmapped metadata into a pre-existing field, you are given the option to choose a field to map the metadata.
|
|
Any metadata extracted that exceeds the size of the field will be discarded.
|
|
If you select the option to create a load file, you are given the option to select a location to save the load file of unmatched metadata.
|
|
Metadata extracted into fields with restrictions or revoked permissions is identified as unmapped metadata.
|
| 22. | Review the number of files imported, then click Finish. |
The new records display in the selected spreadsheet.
| 23. | In the appropriate spreadsheet (e.g., Documents), click the paperclip icon next to the imported record once to display the link/path of the object record, or double-click on the paperclip icon icon to open the object record and verify its content. |
|