Bates stamping PDFs

When running the CaseMap Bates Stamp utility, you will be asked to make a backup copy of all original PDF files that do not have any highlighting or Bates stamping applied to them. If you have not made a backup, please do so at this time.

The Case Map Bates Stamp utility will recognize PDF files that already have a CaseMap Bates stamp applied. By default, CaseMap ignores these files. If you choose to re-stamp PDF files that already have a CaseMap Bates stamp, the original stamps will be deleted and replaced with new stamps. This utility only recognizes Bates stamps created that it has created. If you have documents that are Bates stamped by another program, CaseMap will not recognize them. To track the original Bates numbers and then apply CaseMap Bates stamps, see Address multiple Bates numbering issues before importing documents.

The CaseMap Bates Stamp Utility requires Adobe® Acrobat® v6.0+ (Professional or Standard). It does not work with Adobe Reader®.


ac_tip_icon

CaseMap's DocManager add-in program allows you to Bates stamp files using the Batch Print Wizard. See About DocManager and Batch printing linked documents.


hmtoggle_plus1To apply a Bates stamp to PDFs
1.On the Case Tools ribbon, click File Tasks, and then click Bates Stamp Linked PDFs.

You can also open the CaseMap Bates Stamp utility in Adobe Acrobat by clicking on the CaseMap DocPreviewer button and then clicking Bates Stamping. On the submenu, click Bates Stamp PDFs and then click OK in the message box. If doing so, you can now skip to Step 8.

2.In the message box, click OK to send all linked PDFs in the current spreadsheet to the CaseMap Bates Stamp utility.
3.In the Batch Processing - Review Linked Files dialog box, review linked files and remove any you do not want to Bates stamp.

Batch Processing - Review Linked Files

4.Click OK to continue.

The CaseMap Bates Stamp Utility now launches.

5.On the submenu, click Bates Stamp PDFs.
6.In the message box, click OK.

Notice that Acrobat automatically launches behind the CaseMap Bates Stamp Utility.

7.In the CaseMap Bates Stamp Utility, click Next.
8.In the Select the PDF files you want to Bates Stamp dialog box, click the Add Folder button to navigate to the folder where the PDF files are stored.

You can Bates stamp an individual PDF file by clicking the Add Files button.

9.Verify that the Ignore PDFs that are already Bates Stamped check box is selected.
10.In the Browse for Folder dialog box, select the folder where the PDF files are stored, then click OK.

CaseMap Bates Stamp Utility > Select PDF files dialog box

If you need to delete a file from the list, select it and click the Remove File or Remove All button.

11.Click Next to continue.
12.In the Select the case Bates Numbering format dialog box, select the Create a new case Bates Numbering option, then click Next.

CaseMap Bates Stamp Utility > Bates Numbering dialog box

If you select the Use an existing case Bates Numbering format option, CaseMap will continue using the format you have already been using.

13.In the New Case Bates Format box, select the page number option that is applicable to the document collection you are processing, then click Next.

Bates Stamp New Format dialog box

14.In the Start numbering at field, type the number you want to use for this set of documents.
15.In the Prefix field, select Yes and type the prefix you want to use for the Bates stamp, then click Next.

New Case Bates Format dialog box

16.In the Case Name field, type in the name for the Bates numbering format, then click Finish.
17.In the Review case Bates Numbering format box, verify the Bates numbering range and prefix, as well as format settings.
18.Click the Edit button to modify these settings, then click OK.

Bates Numbering Options dialog box

19.Click Next to continue.
20.In the Choose the order the PDFs will be stamped dialog box, select a PDF file and click the Move Up or Move Down button to modify the stamp order.

Click the Remove File button to delete a PDF file from the listing.

Click the View PDF to review the PDF file before applying a Bates stamp to it.

21.Click Next to continue.
22.In the Review and Begin Bates Stamping dialog box, verify the summary and then select the I have read the above summary and I am ready to proceed check box.
23.Click Finish to initiate the process.
24.In the message box to confirm the number of PDF files successfully stamped with a Bates number, verify that the Select the Send these PDFs to CaseMap after closing this message check box is selected, then click Close.

If you do not select the Send these PDFs to CaseMap after closing the message check box, the documents will be Bates stamp but will not be imported into the case until select the PDF files for import using the Send to CaseMap utility.

25.Complete the steps in the Send PDFs to CaseMap wizard to import PDFs into the case.
26.In the message box displays the number of records successfully imported into the case, click OK.
27.Return to the Documents spreadsheet in the case to verify the PDF file import.

Notice that the Send to CaseMap wizard automatically linked the document record to the PDF source file stored in the network folder.

For more information on using the Send to CaseMap wizard, see Importing PDFs.

hmtoggle_plus1To locate documents with a Bates numbers

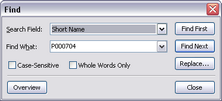
You can locate a case record with a Bates number on the Documents spreadsheet by using the Find tool.

1.In the All Shortcuts pane, click on the Documents icon.
2.On the Home menu, click Find.
3.In the Find dialog box, click on the field you want to search in the Search Field listing.

CM_bates_stamp_find_box

4.In the Find What field, type in the Bates number you want to locate.
5.Click the Find First button.

The document record is now highlighted in the Documents spreadsheet.


hmtoggle_plus1To locate a range of Bates numbered documents

You can also locate a specified range of Bates numbered documents using the Filter feature.

1.In the All Shortcuts pane, click on the Documents icon.
2.Right-click in the Bates - Begin or Bates - End fields.
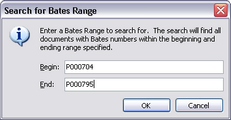
3.On the shortcut menu, click Filter for Bates Range.
4.In the Search for Bates Range dialog box, type in the Bates numbers in the Begin and End fields, then click OK.

CM_bates_range_search_box

The documents within the Bates numbering range specified are now filtered and display in the spreadsheet.

You can save this search if you need it for future reference.


hmtoggle_plus1To modify Bates numbering settings
1.On the File menu, click Options.
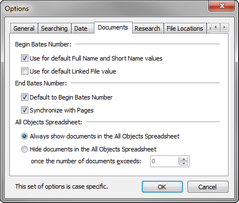
2.In the Options box, click the Documents tab.

Options > Documents tab

3.In the Begin Bates Number and End Bates Number areas, select or clear check box options.
4.Click OK to save your changes.


ac_note_icon

Case option settings are specific to each case.


hmtoggle_plus1To manage Bates numbering formats

You can manage Bates numbering formats in Adobe® Acrobat.

1.Launch Acrobat and close any open documents.
2.Click on the CaseMap DocPreviewer button and then click Bates Stamping > Manage Bates Numbering Formats.
3.In the Manage Bates Numbering Formats dialog box, click the New button.
4.In the New Case Bates Format dialog box, select the maximum number of pages you expect to Bates stamp with this case Bates format, then click Next.
5.In the Start Numbering field, type in the number you want to start with, then click Next.
6.Select whether to include a prefix in the numbering format, then click Next.

If you select Yes, type in the prefix in the Prefix field.

7.In the Case Name field, type in a name for the new case Bates format.
8.Click Finish.

The new Bates numbering format now displays in the Manage Bates Numbering Formats dialog box.

You can modify, rename, and delete numbering formats as needed.

9.Click Close when you are finished.
hmtoggle_plus1To turn off Bates End/Pages Synchronization

CaseMap includes a feature to automatically synchronize Bates number pages for you. This feature is turned on by default.

For example, if you adjust a document record's Bates End entry or the Pages value, then the corresponding field automatically adjusts to remain in synch with this change.

As another example, if you have a document with a Bates - Begin value of P001232 and a Bates - End value of P001234, then the Pages field displays a "3" as its value. The information could have come in through bulk import or is the result of manual entry. When you review the document, you notice that it's actually a four-page document. Changing the value in the Pages field to "4" will automatically synch the Bates - End number to P001235. And vice versa.

1.On the File menu, click Options.
2.In the Options dialog box, click the Documents tab.
3.Clear the Synchronize with Pages check box.
4.Click OK to save the setting change.
hmtoggle_plus1To run the Bates Analyzer

The Bates Analyzer tool allows you to review the Bates numbers in the Bates - Begin and Bates - End fields to locate any inconsistencies, duplications, and anomalies on the Documents spreadsheet.

1.On the Standard toolbar, click Case Tools, and then click Analyze.
2.On the sub-menu, click Bates Analyzer.
3.In the Bates Number Analyzer dialog box, click on the Summary tab to for a complete summary of document processed.

Bates Number Analyzer dialog box

4.Click on the Invalid Documents tab to review the error messages for documents that do not have a valid Bates number.
5.Click on the Duplicate Documents tab to review all duplicate documents.
6.Click on the Duplicate Pages tab to review any duplicate Bates numbers.
7.Click on the Gaps tab to review gaps in Bates numbering for documents, including the number of pages skipped.
8.Click on the Valid Ranges tab to review all valid documents with Bates numbers, including the document and page count.
9.Click on the Save a Report button to save any of the current data to a HTML file for reference purposes.
10.Click Close when you are finished.


related_topics_buttonRelated Topics


Need additional help? Email the CaseMap Support team at: casemap.support@lexisnexis.com, or contact a support representative at 800.543.6862 (Option 2, then Option 4). The CaseMap Support team is available between the hours of 9:00 a.m. to 7:00 p.m. Eastern Time, Monday - Friday.

Copyright © 2018 LexisNexis. All rights reserved.