Navigating CaseMap

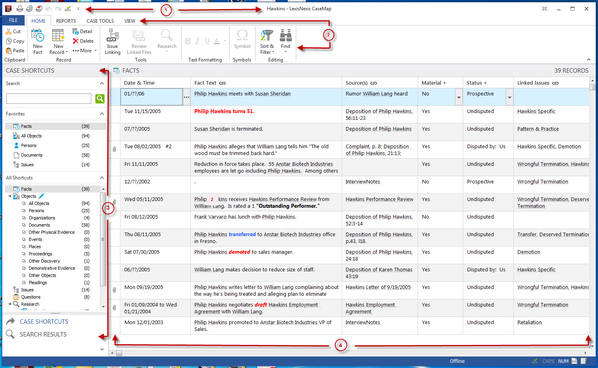
CaseMap's user interface is designed so your spreadsheet data displays in the primary workspace pane (4) for maximum viewing. This workspace pane is where you will enter and track facts, objects, documents, and issues in individual spreadsheets. To move quickly between each spreadsheet, you will use the Navigation pane (3) on the left side of the application. The Navigation pane has two interchangeable panes: Case Shortcuts and Search Results. Each pane is then divided into task panes where tools or shortcuts are organized by groups.

When you are working in a case, use the Case Shortcuts pane to access CaseMap spreadsheets and the Search Results pane (3) to review and narrow search results. You can run full-text searches in either pane.

The tools you need to search, sort, edit, and analyze data as well as create reports are primarily performed by clicking on Main Ribbon (2) tabs/buttons, or by clicking on commands in drop-down menus. All administrative tasks are located on menus.


CaseMap user interface


hmtoggle_plus1To view the number key
1.Title Bar & Quick Access Toolbar

The Title bar displays the current case name and a customizable quick-access toolbar. The toolbar can be customized to add and/or remove buttons/functionality.

CaseMap Title Bar and Ribbons


ac_note_icon

The Quick Access Toolbar can be displayed above or below the CaseMap ribbon by selecting the 'Show Quick Access Toolbar Below the Ribbon' option when customizing the toolbar.


a.In CaseMap, right-click on a tab (i.e., Home) or on a tab on the ribbon to display a set of menu options.

Access Toolbar Menu

b.Click Customize Quick Access Toolbar.
c.In the Quick Access Toolbar Customization dialog box, under the Choose commands from heading, select the command(s) to be displayed and click the right arrow cm_right_arrow to move the command under the Customize Quick Access Toolbar heading.
d.Click OK.

You can also click the More Buttons cm_more_buttons icon on the Quick Access Toolbar and the select a toolbar option for display.

An updated toolbar displays.

2.Ribbons, menus, and Buttons

In CaseMap 11.0 or later, ribbons are used by default to access the most commonly used tasks and functions.

The main ribbon(s) consists of tabs, buttons, and/or menus that let you add or delete records, print, adjust fonts, access record details, add questions, perform multi-level sorting of data on spreadsheets, and more. Buttons and menus are located throughout the various tabs, and some only activate with certain spreadsheets.

Standard Toolbar Buttons

The ribbon can be customized to add/remove tabs to/from the display. All ribbon/toolbar customizations are saved and retained by CaseMap.


ac_note_icon

To use the Standard Toolbar instead of ribbons, go to the File Tab > Options > Accessibility tab, and then select the 'Use standard Windows menu in place of ribbon' check box.


a.In CaseMap, right-click on a tab or on a tab on the ribbon to display the set of menu options.

Access Toolbar Menu

b.Click Customize the Ribbon.
c.In the Ribbon Customization dialog box, in the Choose commands from box, select an applicable option from the list.

Customized Ribbon Menu Options

d.Under the Customize the Ribbon heading, place a check mark next to the tab(s) to be displayed.
e.Use the applicable up cm_up_ribbon_arrow or down cm_down_ribbon_arrow arrow to place appropriately.
I.Under the Customize the Ribbon heading, select the tab/area where the new tab is to be added.
II.Click the Add button and then click Add New Tab.

A new tab is added.

III.Click the Rename button.
IV.In the Display name box, enter a new name for the tab.
V.Click OK.

The new name is displayed.

VI.Click OK to close the Ribbon Customization dialog box.
I.Click the Reset button and select:

Reset on selected tab to reset only settings for the selected tab.

Reset all customizations to reset all customized settings back to the default system settings.

II.Click OK.
h.Click OK to close the Ribbon Customization dialog box.

An updated toolbar displays.

3.Navigation Pane

The Navigation pane runs vertically along the left side of CaseMap and provides access to two different panes: Case Shortcuts and Search Results. Click on the Navigation buttons at the bottom of the pane to access each set of tools.

Navigation Pane

The Case Shortcuts pane provides access to all CaseMap spreadsheets.

Case Shortcuts Panel

Search pane Allows full-text searches to be run on case records and linked files.
Favorites pane — Provides quick access to the five default spreadsheets that you will likely use most: Facts, All Objects, Persons, Documents, and Issues.
All Shortcuts pane — Provides access to all individual object category spreadsheets, as well as the Questions and Research shortcut. The Research shortcut is comprised of three separate spreadsheets: Authorities, Extracts from Authorities, and Authorities and Extracts.


The Search Results pane displays search results for spreadsheet hits as well as any linked document hits.

Search Results

Search pane — Allows full-text searches to be run on case records and linked files.
Narrow Results pane — Provides options for narrowing search results by search hits located in spreadsheets, linked file content, and annotation notes.
Results pane — Displays all spreadsheets that contain records or linked files with search hits. The number of search hits located for each displays to the right of the spreadsheet name.
Resources pane — Provides access to three search results reports.


4.Workspace

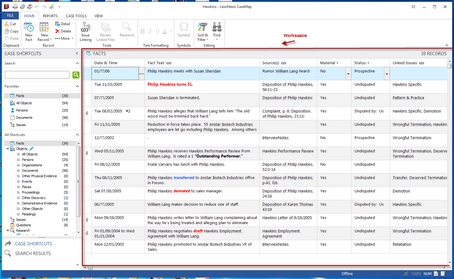
Displays the various spreadsheets you will work in for your case, including the Facts, Persons, Documents, Issues, Events, Pleadings, Proceedings, Questions, and Research spreadsheets, among others. These spreadsheets are where you will enter, modify, and track your case data. Spreadsheet entries are called objects and are collectively displayed in the All Objects spreadsheet.

CaseMap Workspace


related_topics_buttonRelated Topics


Need additional help? Email the CaseMap Support team at: casemap.support@lexisnexis.com, or contact a support representative at 800.833.3346 (option 3). The CaseMap Support team is available between the hours of 9:00 a.m. to 9:00 p.m. Eastern Time, Monday - Friday.

Copyright © 2015 LexisNexis. All rights reserved.