Annotating documents
You can easily annotate any document in DocManager. All annotations applied to a document can be viewed by all case users. And any user can add notes to any annotation. When you type a note, the spellchecking tool is enabled to catch any misspellings that might occur.
All annotations display in yellow (by default), so you can easily locate them in a document. You can change the color of the annotations for your personal viewing preferences. For example, you can change the annotation color to green for your view and another user can change the annotation color to blue for his or her view. When annotations are printed, the color setting can also be changed for the printed output color — without affecting your personal view color.
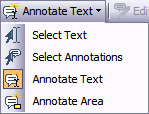
DocManager has four different modes depending on the task you need to do. When a document displays in DocManager, the Annotate Text mode is selected by default.

DocManager includes four annotation modes:
| • | Select Text — allows you to view annotation content already applied to the document or image. |
| • | Select Annotations — allows you to select an annotation for editing. |
| • | Annotate Text — allows you to select highlight and annotate selected text (default mode). |
| • | Annotate Area — allows you to highlight and annotate a region or graphic on the document. |
When multiple annotations are applied to a document, you can navigate from one to the next using the Next Annotation and Previous Annotation buttons in the Edit Annotation dialog box. See Editing annotations.
|
Annotations applied to an image will not include any image text that displays underneath the annotation. But once the image has been OCR processed, CaseMap will include the underlying text when a new fact record is created for the annotation. See Creating new facts/extracts from annotations. |
For information on changing annotation default options or hit highlighting options, see Changing DocManager options.
If there is not a note associated with the annotation, no text displays. |
You can only select one annotation at a time.
The selected annotation now displays outlined in a rectangle to distinguish it from other annotations in the document. For more information on editing, see Editing annotations. |
You can also click the Tools menu and then click the first menu item to open the pop-menu, and click Annotate Text.
The text you selected displays in the Document Text box.
|
CaseMap will only index text from a graphic if the document has been OCR-processed as an image.
You can also click the Tools menu and then click the first menu item to open the pop-menu, and click Annotate Area.
|
